General Information
Macro Manager Guide
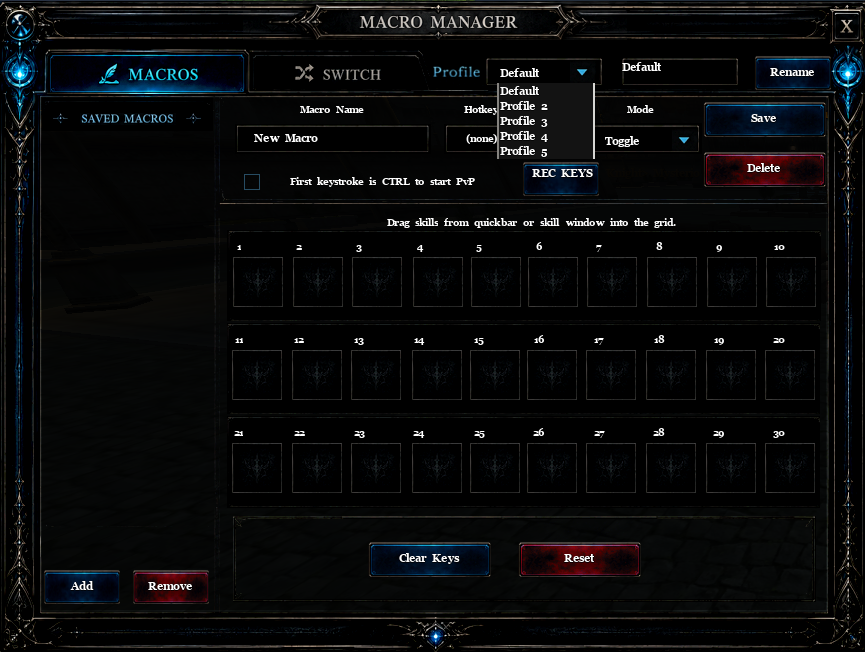
The Macro Manager is a single window with two tabs:
- MACROS — automate a sequence of skills, items or recorded keypresses behind a hotkey (Toggle / Hold / Run Once).
- SWITCH — save equipment loadouts as A/B sets, swap them with a hotkey.
Both tabs share the same Profile system: each character gets five independent profiles per tab, so you can keep five completely separate sets of macros and five separate sets of switch loadouts ready to swap between on the fly.
Contents
- Profiles (shared by both tabs)
- Part 1 — Skill Macro
- Part 2 — Keystroke Recording (REC KEYS)
- Part 3 — Item Set Switch
- Part 4 — Related Game Options
- Part 5 — Tips & Gotchas
Profiles
What a profile is
A profile is a self-contained slate of 10 configs (macros on the MACROS tab, switches on the SWITCH tab) together with all of their hotkey bindings. Each character has five always-present profiles per tab — named Default, Profile 2, Profile 3, Profile 4, Profile 5 out of the box. You can't add or remove profiles; you rename them in place.
The MACROS tab and the SWITCH tab have their own independent profile selection — you can be on Macro Default while running Switch Profile 3.
The profile bar
At the top of each tab:
- Dropdown — lists all five profiles by their current names. Click a row to switch.
- Name field — always shows the active profile's name. Edit it and click Rename to commit.
Switching profiles
When you switch profile the engine:
- Saves the current live working set back into the outgoing profile's slot.
- Unregisters the outgoing profile's hotkeys from the engine, so the incoming profile is free to reuse the same scan codes for completely different macros/switches.
- Loads the incoming profile's configs and re-registers its hotkeys.
- Stops any running macro (a profile change is a hard cut, not a hand-off).
Renaming a profile
- Pick the profile you want to rename from the dropdown.
- Type the new name into the name field next to the dropdown.
- Click Rename. The dropdown updates immediately and the name persists to disk.
Where profiles live on disk
- Skill Macro:
<GameDir>\ini\SkillMacro_<charID>.dat— holds all 5 macro profiles, with all their configs, grids, recorded keys, hotkeys, mode settings and ForcePvP flags. - Item Set Switch: the client file
<GameDir>\ini\ItemSwitch_<charID>.datholds the 5 switch profiles' names, hotkey bindings and config metadata. The actual saved item lists for each Set A / Set B live on the server, keyed per character.
Filenames are sanitized (a-z, A-Z, 0-9, [, ] only) so unusual character names still produce a valid path. If you had a save from before the profile system, it's migrated transparently into Default on first load.
Part 1: Skill Macro
What it does
A macro fires the slots you placed in its grid, one per ~250 ms tick, while it is active. It picks the next ready slot via round-robin so cooldowns don't stall the rotation. Slots can hold one of three things: a skill, a consumable item, or a recorded keypress (see Part 2).
Opening the panel
Bind a hotkey to Skill Macro in Custom Keys, or use whatever in-game button opens the Macro Manager. The MACROS tab is the default view.
The left panel: Saved Macros
- Add — creates a new macro with a placeholder name ("New Macro", "New Macro 2", …) inside the active profile. Autosaved on creation.
- Remove — deletes the highlighted macro from the active profile.
- Click a row to load that macro into the editor on the right. The selected row gets a cyan bar and amber text.
- Each row shows
Name [Hotkey]— e.g.BUFF [XButton1]. - Up to 10 macros per profile × 5 profiles = 50 macros per character.
The editor
| Field | What it does |
|---|---|
| Macro Name | Free text. Click Save to persist. Empty macros (no slots filled) are now allowed — you need to Save first before recording into the slots. |
| Hotkey | Click REC, then press the key combo you want. Modifiers (Ctrl/Shift/Alt/Ctrl+Shift) are captured automatically. Clicking REC auto-stops any currently running macro so the capture doesn't fire it. |
| Mode | Dropdown — Toggle / Hold / Run Once. See below. |
| First keystroke is CTRL to start PvP | Per-macro checkbox. When ON, the macro's first cast is a force-attack (same as physically holding Ctrl). After it lands you're flagged for PvP and the rest of the rotation uses normal targeting. |
| Grid (30 slots visible, 50 max) | Three ways to fill a slot: drag a skill from the skill window, drag a consumable item from the inventory, or click REC KEYS and record a key (see Part 2). Each slot also gets a small text label overlay showing the recorded key's name, e.g. 3, =, -. Right-click a slot to clear it. |
| Save / Delete | Persist or remove the current macro within the active profile. |
| REC KEYS | Toggles keystroke recording into the grid. See Part 2 for the full workflow. The button turns red while recording. |
| Clear Keys | Wipes all 30 slots in the current macro, stops any active macro or recording, then saves. The macro's name, mode, hotkey, and ForcePvP flag are preserved — only the grid contents are emptied. |
| Reset | Full restore. Slots cleared, mode set to Toggle, hotkey unbound, ForcePvP cleared, name reset to New Macro. Use this to recycle a macro slot. |
Modes
- Toggle — press the hotkey to start, press again to stop. Holding the key has no effect (the engine debounces against auto-repeat).
- Hold — runs only while the hotkey is held. Release it and the macro stops on the next tick.
- Run Once — fires a single sequential sweep through the grid (slot 1 → 50), one slot per ~250 ms tick. Slots that aren't ready (still on cooldown, no target, out of range, empty) are skipped, not waited on — the cursor advances either way. The pass stops automatically the tick after it walks past the last slot, and you'll see
Skill Macro: run-once complete.in chat. Pressing the hotkey again restarts the sweep from slot 1.
Slot types: Skill / Item / Key
A slot holds exactly one of the three:
- Skill — drag from the skill window. Plays back as a normal cast through the skill system; cooldowns / mana / GCD apply.
- Item — drag a consumable (CC pot, lens, passport, detect scroll, food, XP / drop booster, etc.) from inventory. Items don't go through the skill-cooldown gate — the server decides whether the use lands — so the macro fires the item every time it reaches that slot and lets the engine accept or reject it.
- Key — recorded via REC KEYS. Plays back as a synthetic Win32 keystroke (the game sees it as if you physically pressed the key), so it triggers whatever you have bound to that key — usually a quickbelt skill or item. See Part 2.
You can mix all three types freely inside one macro.
Hotkey capture rules
- Keyboard — any key. Modifiers held during REC are recorded.
- Function keys F1–F24 — all capturable, including F13–F24 from Logitech G-key style keyboards.
- OEM punctuation keys —
-=[];'`\,./and the ISO<>key are all bindable. AZERTY / QWERTZ / ISO layouts can bind their layout-specific top-row punctuation, M-neighbour and GBP keys. - Mouse: MButton, XButton1, XButton2 — capturable. When bound, every press fires the macro and is consumed by the engine (the camera/UI handlers downstream don't see it).
- Mouse: LButton, RButton — deliberately not capturable. They're load-bearing for UI clicks and character control; binding them would lock you out.
- Mouse wheel directions — labels only; not bindable.
- Esc during REC — cancels capture, keeps the existing binding.
- Del during REC — unbinds the macro's hotkey. The macro stays saved (slots, name, mode); it just won't fire from a key any more.
Where it's stored
Per-character file on disk: <GameDir>\ini\SkillMacro_<charID>.dat. Holds all 5 profiles with every config (name, mode, grid contents including recorded keys + modifiers, hotkey, ForcePvP flag) and the profile names. Deleting that file wipes all macros and profiles for that character.
Part 2: Keystroke Recording (REC KEYS)
What it does
REC KEYS lets you bake a sequence of keypresses into a macro's grid. When the macro runs, those keys are injected back into the game as if you'd typed them — so the slot fires whatever the game has bound to that key (typically a quickbelt skill or item). This is the right tool for two situations:
- Skills the macro can't cast directly (charge-up skills, skills that won't accept a programmatic cast).
- Long rotations where you want to chain quickbelt slots without the engine's per-skill rules.
The workflow
- Create or open a macro and click Save first. (Empty saves are allowed — you don't need a skill on the grid.)
- Click REC KEYS. The button turns red and chat shows
Key recording started.... - Press the keys you want, in order. Each press is appended to the next free slot in the grid and chat confirms
Recorded <key>. - To record a key with a modifier, hold Ctrl, Shift, or Alt while pressing the key. The slot stores the modifier alongside the key (e.g.
Ctrl+3). - Click REC KEYS again to stop. The macro is saved automatically.
- Bind a hotkey to the macro, pick a mode, and trigger it.
Which keys can be recorded
Recording is restricted to the top-row numerical keys typically used for the quickbelt:
| Keys | Notes |
|---|---|
3 4 5 6 7 8 9 0 |
Main-row digits. |
= - |
Top-row punctuation (next to 0). |
1 2 |
Deliberately excluded — reserved for general game use, not bindable here. |
| Anything else | Silently dropped — pressing it does nothing during REC KEYS. |
Each of the 10 supported keys has four icon variants (no modifier, Ctrl, Shift, Alt) that paint over the slot while the macro is loaded, so you can tell at a glance whether Slot 3 holds 5 or Shift+5.
How modifier capture decides which modifier wins
- Only one modifier per slot.
- If you hold more than one modifier when you press the key, the modifier you pressed most recently wins. Example: hold Shift, then add Ctrl, then press
3— you getCtrl+3. - Modifiers already held when you click REC KEYS are included in the ranking, so you don't have to release and re-press them.
How playback works
- Each KEY slot fires a synthetic press of its stored VK code (and a press of the stored modifier, if any). The game's window-message handler sees it like any keyboard event and dispatches it.
- No client-side cooldown gate on KEY slots — whatever the player's bind handles its own readiness (skill cooldown, item charges, etc.).
- You can freely mix KEY slots with SKILL and ITEM slots in the same macro — the round-robin / sweep logic treats them all the same way.
Part 3: Item Set Switch
What it does
Each "switch" holds two equipment loadouts — Set A and Set B — saved as snapshots of what you were wearing when you captured them. Press the switch's hotkey to swap your equipped gear between them.
Opening the panel
Click the SWITCH tab inside the Macro Manager. The Switch tab has its own independent profile bar — up to 10 switches per profile × 5 profiles = 50 switches per character.
The editor
| Field | What it does |
|---|---|
| Switch Name | Free text. Click Save. |
| Hotkey | Same REC flow as macros. Same key restrictions. |
| Set A grid | Read-only preview of what's saved in Set A. Right-click an entry to remove that single item from the saved set; the next swap won't touch that slot. Re-populates on every opening of the Macro Manager. |
| Set B grid | Same. |
| Capture Set A | Snapshots everything you're currently wearing into Set A. Re-capturing overwrites the previous snapshot. |
| Capture Set B | Same, but writes to Set B. |
| Save / Delete | Persist or remove the switch config (name + hotkey) within the active profile. |
How you fill a switch
- Put on the gear you want for Set A.
- Click Capture Set A — the server snapshots your equipment into Set A.
- Swap to the gear you want for Set B.
- Click Capture Set B.
- Click Save to persist the switch name/hotkey.
How a swap actually works
- The client picks which set to apply, then sends a request to the server (server is authoritative on equipment).
- The server snapshots the saved set's contents and starts swapping one slot at a time.
- Each tick (~200 ms) the server unequips the current item in that slot and equips the saved item — slot-by-slot, not all-at-once-then-back.
- The switch only touches the slots you actually saved. Slots that were never captured (or were right-click-removed from the set) are left alone — no surprise unequips.
- If you press another switch hotkey mid-swap, the running session aborts and the new request takes over — no queueing.
Which set fires (priority rules)
The same hotkey rotates A ↔ B within that switch. Pressing a different switch's hotkey always starts that switch at Set A (it's "fresh" for that switch), regardless of where any other switch left off.
With two switches bound to F1 and F2:
| Sequence | What runs |
|---|---|
| F1, F1, F1 | A → B → A |
| F1, F2 | F1's A, then F2's A |
| F1 mid-swap, F1 again | A → cancel → B |
| F1 mid-swap, F2 | A → cancel → F2's A |
| F2 mid-swap of B, F1 | F1's A (the F2 swap is cancelled) |
Requirements & limitations
- You need at least 10 free inventory slots when starting a swap (one for each displaceable equipment slot). If you don't, the server rejects the request with a system message.
- Avatar / cosmetic suit slots are deliberately excluded. The switch system never touches them — that's by design, because capturing and re-equipping suit pieces breaks the avatar set's pairing and dumps the displaced pieces into your inventory.
- Mount, Lancer and Oreads slots are also excluded (those are separately managed).
- The Use new item switch system option (Game Options → Function) is honored: when ON, the engine does 1:1 inventory cell swaps; when OFF, displaced items go to the first free cell.
Where it's stored
- Client (profile names, hotkeys, switch names, set ↔ slot mapping):
<GameDir>\ini\ItemSwitch_<charID>.dat. - Server (the actual saved item lists for each Set A / Set B in every switch of every profile): per-character rows in the game database, keyed by character ID and an absolute slot ID (
profile * 20 + configIndex * 2 + setIndex).
Part 4: Related Game Options
Two Macro-Manager-related toggles live in Game Options → Function:
- Click to stop macro — when ON, a fresh left-click anywhere stops any running skill macro. Detected as a rising edge on left-click, so holding LMB doesn't repeatedly stop a macro that just restarted. Defaults to OFF. Persisted in
COption.ini. - Use new item switch system — controls how displaced items land in your inventory during a switch (1:1 cell swap vs first-free-cell). See above.
Part 5: Tips & Gotchas
Per-character config
Macro and switch configs — including profile names and all five profiles — are per-character on the client; the actual equipment in a switch's Set A/B is per-character on the server. Switching characters loads that character's own five profiles on each tab. Race-form transforms (e.g. Dragonscion) trigger a UI re-sync so your macros and switches stay populated through the form change.
Use profiles to swap loadouts fast
Treat profiles as "loadouts" of macros and switches:
PvE: farming rotations, mount swap, lens pots.PvP: force-PvP openers, CC pot macro, two-piece gear switch.RAID: long Run Once bursts, dedicated buff macro.
Rename the five built-in profiles and you have five always-on loadouts you can swap into in two clicks.
KEY slots vs SKILL slots
- Use SKILL slots when the macro should be self-contained — the skill comes from the macro itself, regardless of what's on your quickbelt.
- Use KEY slots when you want the macro to drive your existing quickbelt setup — press
5and the macro fires whatever you currently have in quickbelt slot 5. Re-arranging the quickbelt automatically changes what the macro does. - Use KEY slots with modifiers to reach quickbelt rows two through four without remapping the quickbelt itself.
- Use ITEM slots when you want a specific consumable to fire regardless of what's on the quickbelt.
Custom Keys conflicts
When a mouse button is bound to a macro or switch, that button's normal action (camera rotate, etc.) is suppressed while the binding exists. If you want MButton back as camera rotate, REC + Del to unbind.
Keyboard keys that overlap a Custom Keys binding aren't blocked at REC time — the macro hotkey and the Custom Keys action will both fire on the same press. If that's a problem, rebind one of them.
Run Once tips
- Set the rotation once with carefully-ordered buffs/cooldowns and use Run Once to fire the whole burst window on demand.
- Run Once does a single forward sweep and doesn't wait on per-slot cooldowns. If you want a slot to land, make sure its cooldown is already up before you trigger the sweep.
- Empty slots and slots that fail for any reason (cooldown, no target, out of range) are skipped — the pass keeps moving and stops at the end.
- Pressing the hotkey again during a pass restarts it from slot 1.
REC / REC KEYS gotchas
- Clicking REC to capture a hotkey auto-stops any running macro so the capture doesn't fire it on the way in.
- Closing the Macro Manager UI while REC KEYS is active auto-stops recording — safe to alt-tab.
- REC KEYS requires the macro to already be saved (the recording writes into the current config's slots), so name → Save → REC KEYS is the right order.
First-keystroke PvP checkbox
- Per-macro setting, persisted with the rest of the config.
- Only the first cast in each run is forced — subsequent casts use whatever targeting state the player has.
- Useful to turn a defensive/utility rotation into an offensive one against a player target without needing to hold Ctrl.
"Click to stop macro" tips
- Lets you bail out of a misfired macro without reaching for the keyboard.
- Only the rising edge of LMB counts — spamming clicks while a macro restarts won't loop-stop it.
- Doesn't affect Item Set switches (those are server-authoritative and not driven by the macro tick).
Locked out by a legacy LButton/RButton binding?
If you have an older save where you bound LButton or RButton (which the current build forbids), delete <GameDir>\ini\SkillMacro_<charID>.dat and/or <GameDir>\ini\ItemSwitch_<charID>.dat, then re-launch and rebind your hotkeys.
Spot an error or something outdated? Let us know on Discord.