-
Accessories 3
-
Awakening of the Eternal Storm Episode Guide 7
-
Boxes and Contents 3
-
Chantra Pass 3
-
Character Guide 7
-
Crusade of Zian Episode Guide 3
-
Heavens Hell Guide 9
-
Hurry Up Buddy Game Mode 2
-
Macro Manager 1
-
Rifts 1
-
Seasonal Server 1
-
Server Roadmap 1
-
Siege System and Rewards 2
-
Test Server 1
-
The Purgatory (Rank 5 Titles) 1
-
Titles 3
Character Guide
Archer Guide
Section
This guide has not been translated to 한국어 yet, so the English version is shown.
Archer Guide
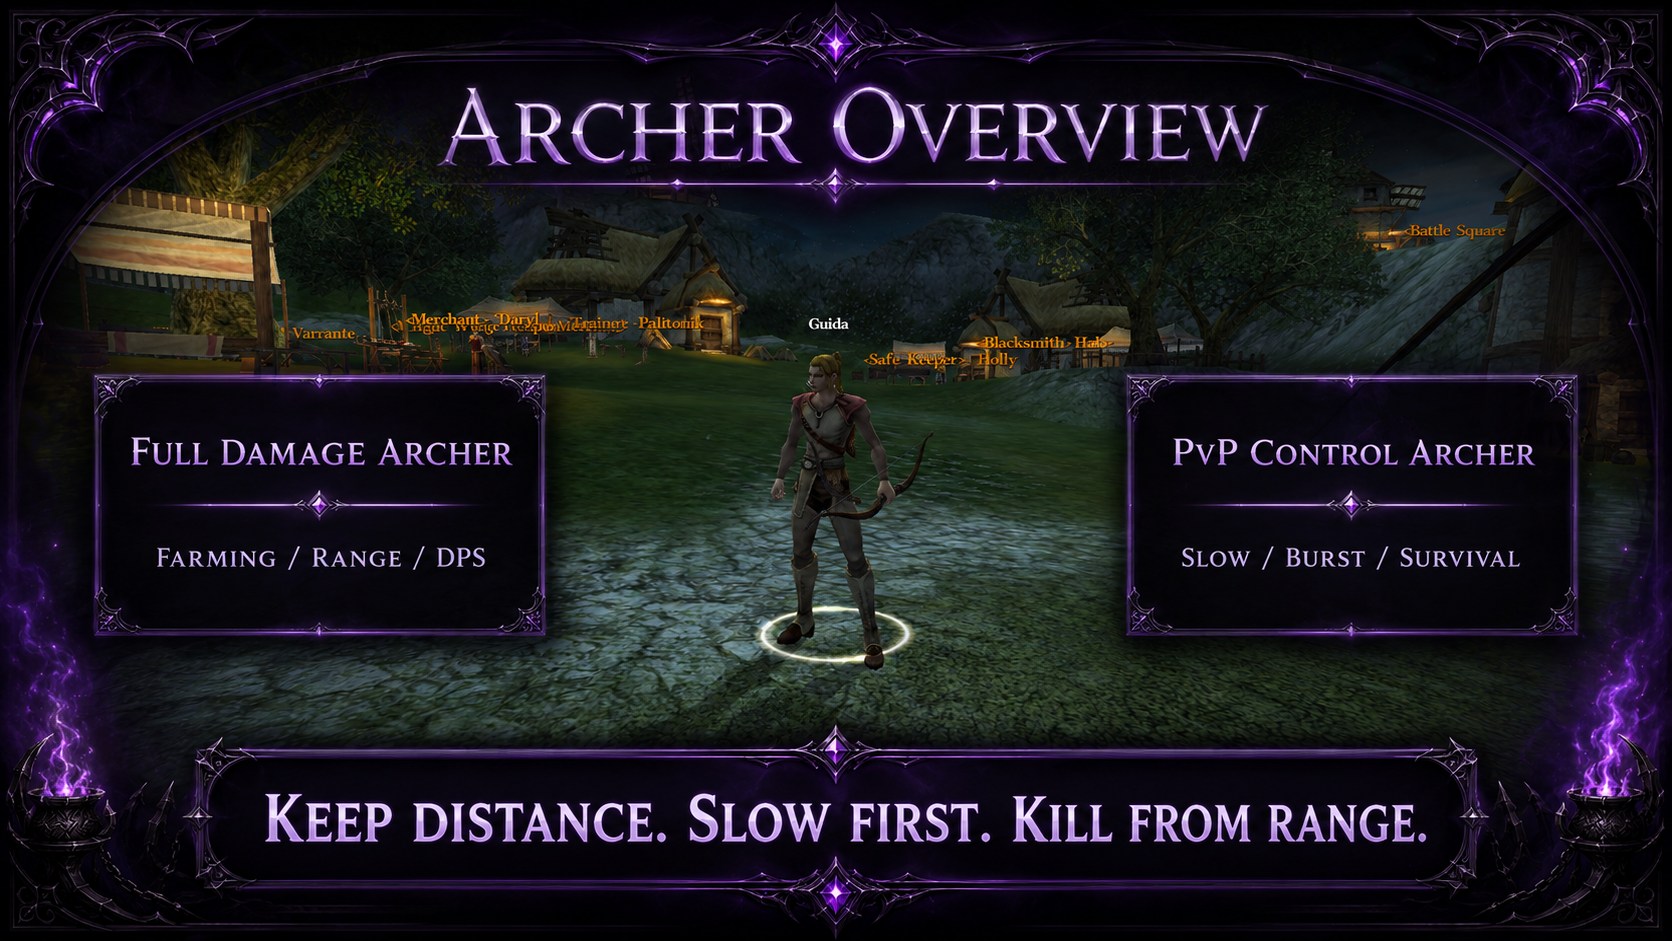
Archer Overview
Archer is a Human ranged class.
Archer fights from distance, slows enemies, controls pulls, and kills with fast physical damage, bow skills, crossbow skills, and strong single-target pressure.
Archer is strong because he has:
- Long attack range
- Strong single-target damage
- Good attack speed
- Good movement
- Strong slows
- Good control skills
- Good PvP pressure
- Safe farming when played correctly
Archer is weak because he does not survive well when enemies reach him.
If you stand still inside monsters, Archer dies fast.
If you use range, slows, movement, and gear switching, Archer becomes one of the safest and cleanest farming classes.
Archer has three main setups.
| Build | Best use | Main idea |
|---|---|---|
| Full Damage Archer | Leveling, farming, PvE damage, Rifts, Firmament | Kill mobs fast with damage, attack speed, range, and control |
| PvP Control Archer | PvP, siege, open-world fights, boss pressure | Stay behind frontline, slow enemies, burst key targets |
| Hybrid Archer | Hard farming, HH, Firmament, Monster Hunt, PvP risk | Keep enough damage to farm and enough defense to survive |
New players should level as Full Damage Archer.
Later, every Archer should build a Hybrid / PvP survival set.
Archer is not a real tank class. Tank items are used to survive focus, not to farm faster.
Use Full Damage gear when farming.
Use Hybrid gear when mobs hit too hard.
Use PvP Control gear when players can attack you.
Official guide: Archer Skill Builder ↗
Official guide: Unique Rings ↗
Official guide: Unique Necklaces ↗
Official guide: Rank 4 Titles ↗
Official guide: Rank 5 Titles ↗
Official guide: Archer Yellow Armor List ↗
Official guide: Heaven’s Hell Armors ↗
Official guide: Nightfall Armor Set ↗
Official guide: Oreads and Elixirs ↗
Official guide: Macro Manager ↗
First Steps as an Archer
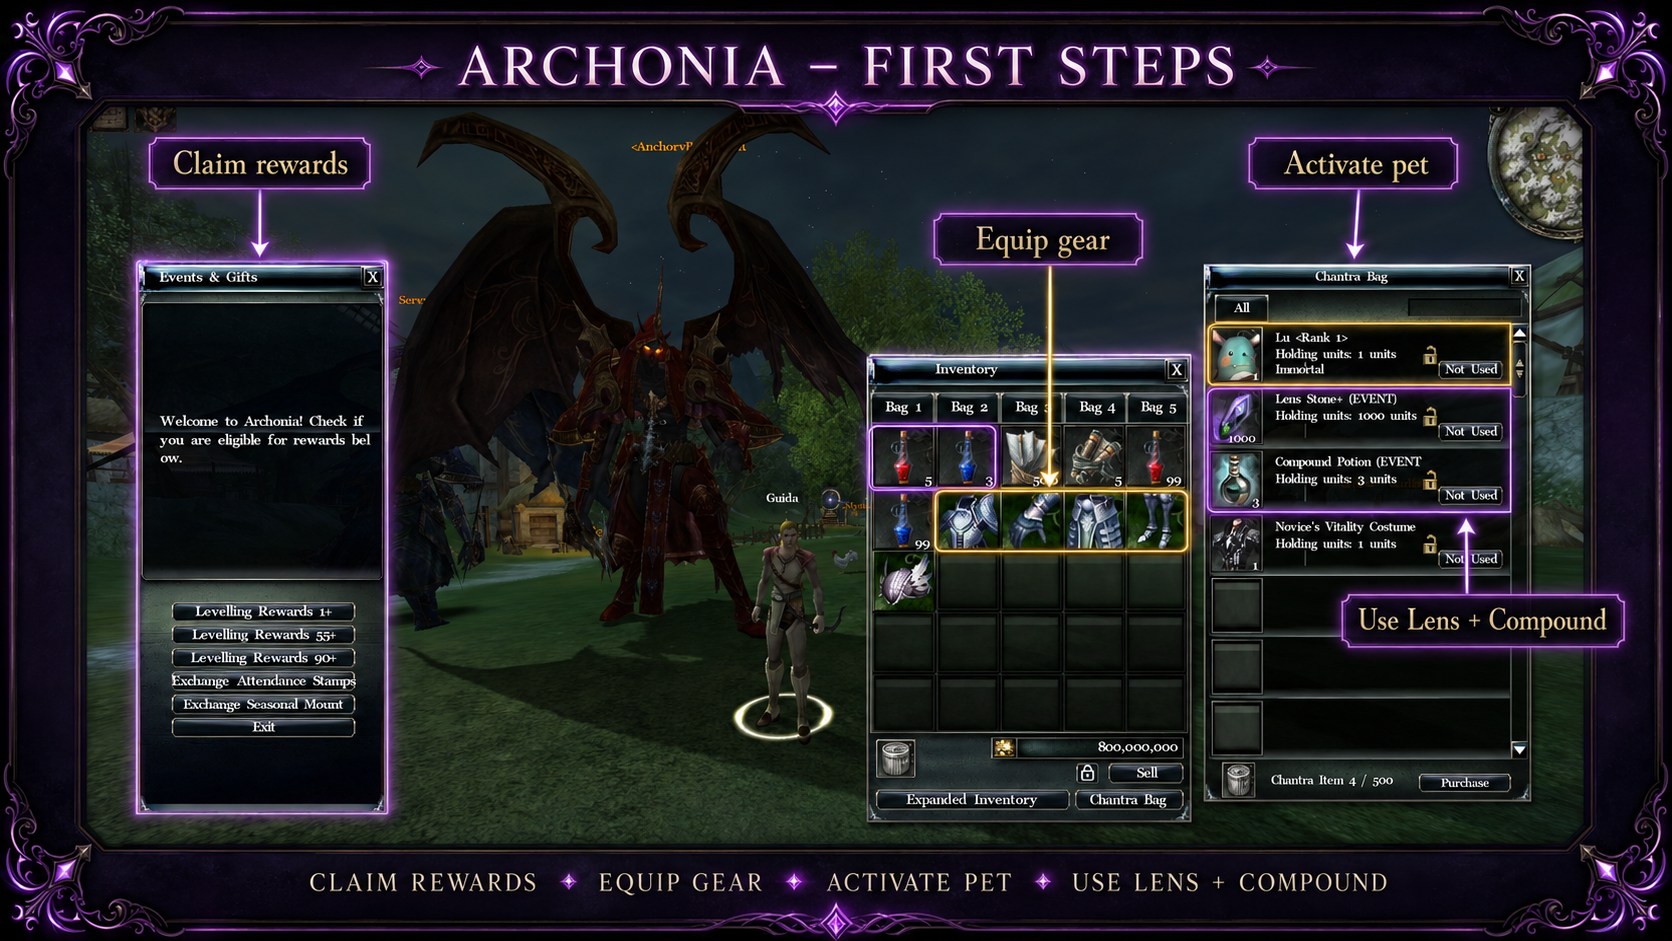
After creating your Archer, you start in Anchorville.
Find the red dragon Event NPC. This NPC gives level-up rewards.
Claim your first reward and equip all starter armor pieces.
Open your chantra bag with B and activate:
- Lens Stone+
- Compound Potion
- Pet
- Life Potions
- Mana Potions
Your pet collects drops while you farm. Keep it active.
Use Ctrl + Left Double Click to lock important items.
Archer uses range to stay safe, but early gear is weak. Do not pull too many mobs before your damage and attack speed feel good.
Official guide: Level Up Rewards ↗
Basic Archer Rules
Follow these from level 1.
| Rule | Why it matters |
|---|---|
| Keep Lens Stone+ active | Faster farming and better damage |
| Keep Compound Potion active | Better damage, cast speed, cooldown, and smoother skills |
| Keep pet active | Drops are collected automatically |
| Upgrade weapon first | Archer damage depends heavily on weapon power |
| Do not fight inside mobs | Archer is ranged, not a front-line tank |
| Slow before mobs reach you | Slows are what make Archer safe |
| Use range advantage | Start fights before mobs touch you |
| Build Hybrid gear later | Needed for HH, Firmament, PvP risk, and event mobs |
| Learn gear switching | Archer needs damage set and survival set |
Correct Archer farming style:
- Stand at range.
- Pull a small or medium group.
- Slow the group.
- Use damage skills.
- Move back if mobs get close.
- Finish with burst skills.
- Move to the next pack.
Bad Archer farming style:
- Standing still while mobs hit you.
- Pulling the whole room with weak gear.
- Forgetting buffs.
- Using only auto-attacks when skills are ready.
- Ignoring weapon upgrades.
- Farming in full damage gear when mobs are already killing you.
Archer Skill Sets
Archer can use different saved skill sets.
Main Archer skill sets:
| Skill set | Best use |
|---|---|
| Full Damage Set | Leveling, farming, PvE damage |
| PvP Control Set | PvP, siege, open-world fights |
| Hybrid Set | Hard farming when Full Damage dies too fast |
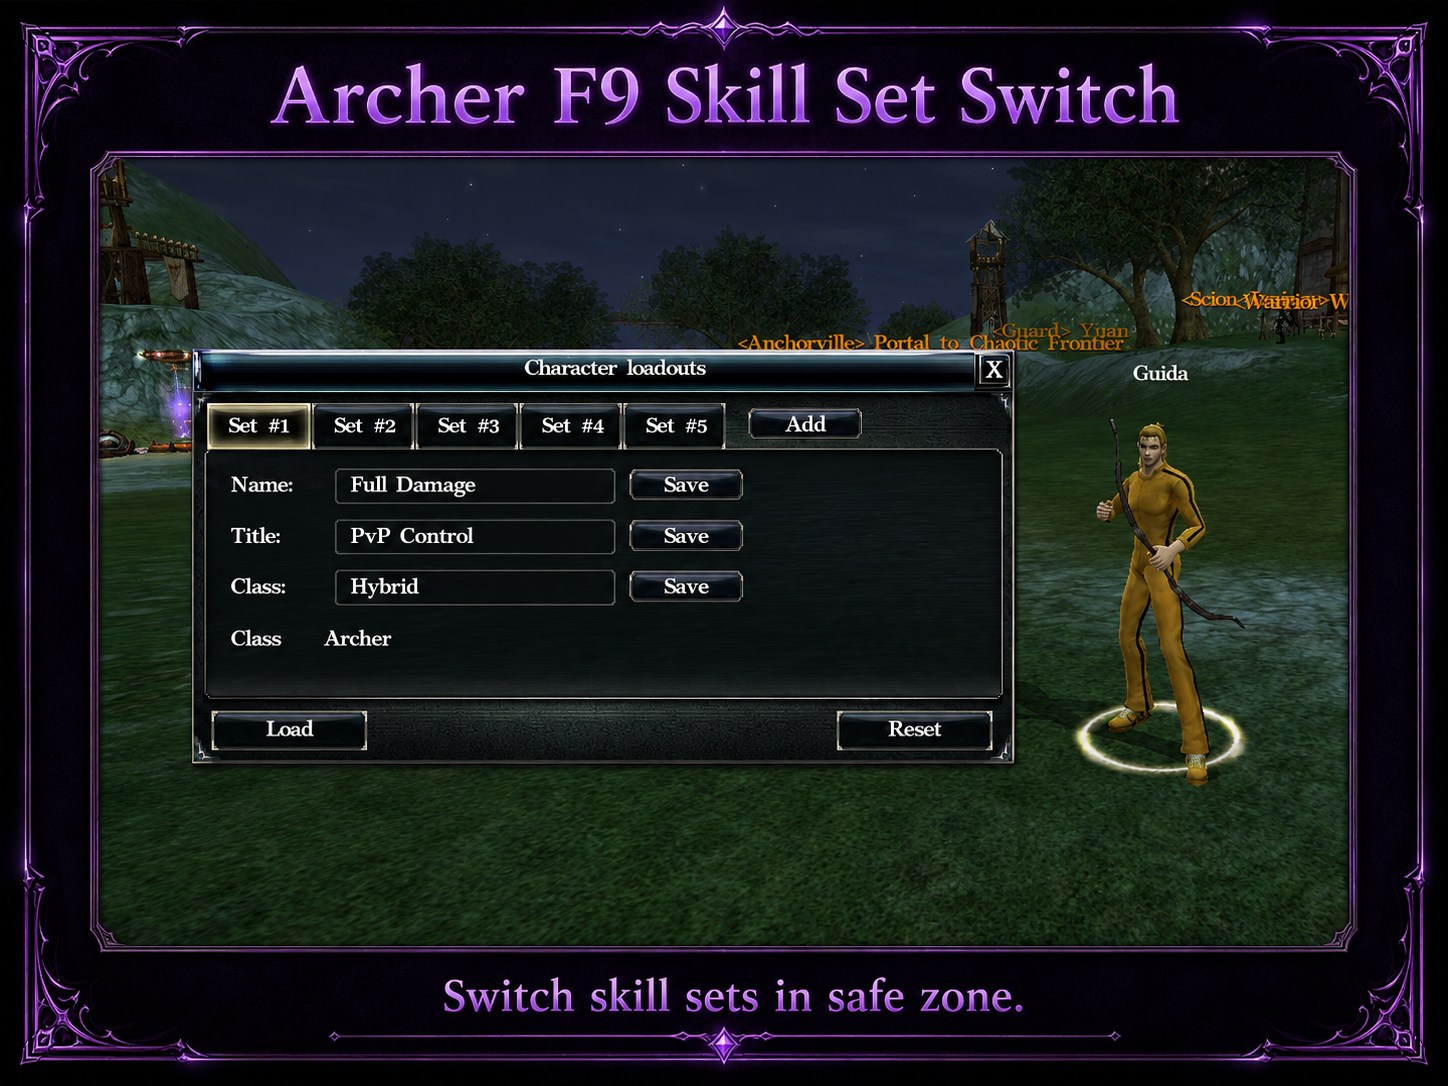
Press F9 to open the Set Switch window.
Use Full Damage Set while farming.
Use PvP Control Set when fighting players.
Use Hybrid Set when you need more survival but still want to farm.
Full Damage Archer
Full Damage Archer is the main leveling and farming build.
Use this build for:
- Early leveling
- Dungeon farming
- Asylum farming
- Realm farming
- Shinewood farming
- Heaven’s Hell leveling if you survive
- Rifts
- Firmament farming
- Monster Hunt event mobs if you can control the pull
Full Damage Archer focuses on:
- Physical Damage
- Damage
- Heroic Attack Power
- Attack Speed
- Attack Rating
- Critical Hit Rate
- Critical Damage
- Ignore Defense
- Ignore Block Rate
- Ignore Skill Block Rate
- Movement Speed
- Skill cooldown
- All Stats
Archer damage depends on the weapon and accessory setup. If mobs die slowly, upgrade weapon before blaming the spot.
Bow or Crossbow
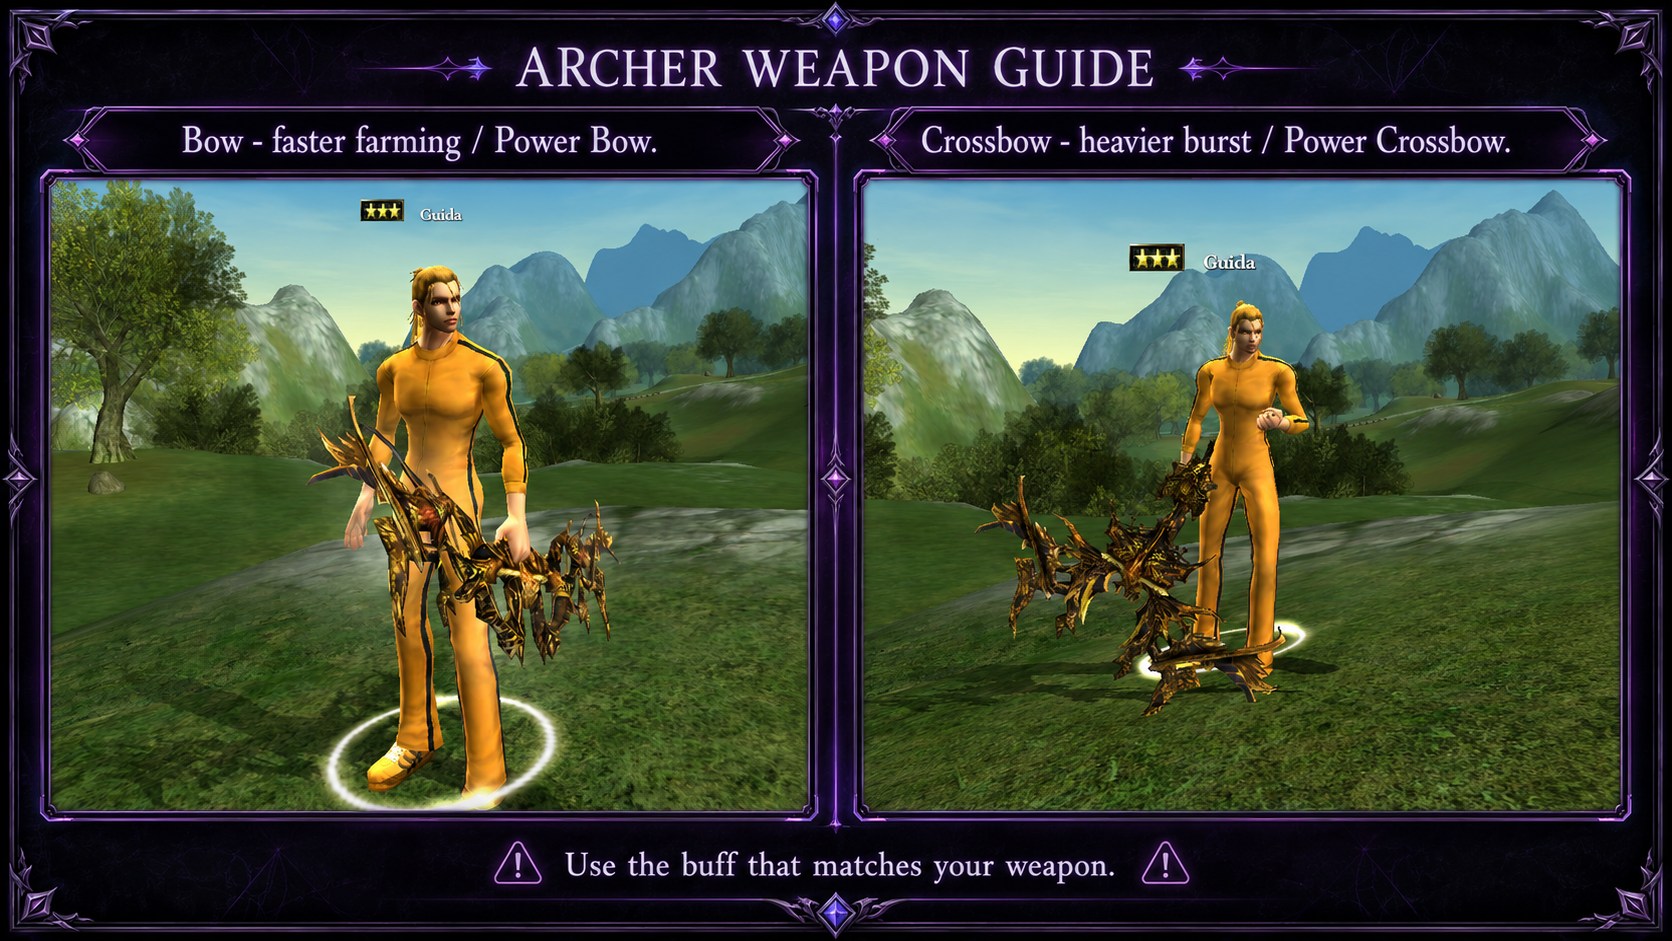
Archer can play with bow or crossbow.
Do not choose randomly. Your weapon decides which buff matters.
| Weapon | Best use | Important buff |
|---|---|---|
| Bow | Smoother farming, faster attacks, better comfort | Power Bow |
| Crossbow | Heavier hits, stronger burst style | Power Crossbow |
Simple rule:
Use Bow if you want smoother leveling and farming.
Use Crossbow if your gear is strong and you want heavier burst.
Do not learn both weapon paths deeply unless you actually switch weapons.
If you use Bow, keep Power Bow active.
If you use Crossbow, keep Power Crossbow active.
Full Damage Archer Skills
Use the official Skill Builder for exact points.
Official guide: Archer Skill Builder ↗
Main Full Damage skills:
| Skill | Use |
|---|---|
| Dual Shot | Basic fast attack skill |
| Piercing Shot | Straight damage skill |
| Magic Arrow | Strong hit with stun value |
| Triple Shot | Strong ranged burst |
| Chain Action | Damage plus movement slow value |
| Blinding Strike | Damage plus enemy attack rating reduction |
| Fire Shot | Extra damage skill |
| Charge Shot | Burst skill |
| Sniper Shot | Heavy single-target damage |
| Burst Shot | Fast damage skill |
| Arrow Hail | AoE farming skill |
| Phoenix | AoE / farming damage |
| Forces of Nature | Strong slow and damage tool |
| Snare Shot | Control tool for safer farming |
| Power Bow | Main bow buff |
| Power Crossbow | Main crossbow buff |
| Rock Skin | Defense and Skill Block survival buff |
| Sharp Shooter | Accuracy, dodge, and cast value |
| Far Sight | More range |
| Poison Shot | Damage over time / pressure |
| Helpless | Strong enemy defense/resistance debuff |
| Heavy Hand | Strong PvP control against speed/cast users |
| Dash | Movement |
| Critical Hit | Damage value |
| Sure Sight | Accuracy value |
| Hurricane of Death | Rank 5 damage direction |
| Bow of Meditation | Rank 5 utility/damage direction |
| Scorpion Trap | Rank 5 control direction |
| Cloud of Arrows | Rank 5 AoE direction |
| Illusion Stride | Rank 5 movement/survival direction |
| Slight of Bow | Rank 5 Archer value direction |
Full Damage priority:
- Weapon buff first: Power Bow or Power Crossbow.
- Range and accuracy buffs: Far Sight, Sharp Shooter.
- Survival buff: Rock Skin.
- Main damage skills.
- AoE farming skills.
- Slows and control skills.
- Rank 5 damage skills later.
Do not put every skill into your farming macro. Use the skills that clear packs cleanly.
Full Damage Archer Farming Rotation
Use this flow when farming:
- Buff before pulling.
- Stand at range.
- Pull a safe group.
- Use slow/control before mobs reach you.
- Use AoE skills on grouped mobs.
- Use burst skills on stronger mobs.
- Move back before mobs surround you.
- Repeat.
Simple farming rotation:
| Step | Skill type |
|---|---|
| 1 | Power Bow or Power Crossbow |
| 2 | Sharp Shooter / Far Sight / Rock Skin |
| 3 | Forces of Nature or Snare Shot |
| 4 | Arrow Hail / Phoenix |
| 5 | Triple Shot / Chain Action |
| 6 | Magic Arrow / Blinding Strike |
| 7 | Sniper Shot or Charge Shot for strong targets |
| 8 | Move back and reset distance |
If mobs reach you too fast, slow earlier.
If mobs still reach you, pull fewer mobs.
If you die even with smaller pulls, switch to Hybrid gear.
PvP Control Archer
PvP Control Archer is for player fights, siege, arena, and open-world danger.
This build is not only about damage. Archer must slow, debuff, burst, and move.
PvP Control Archer focuses on:
- Attack Speed
- Attack Rating
- Ignore Defense
- Ignore Block Rate
- Ignore Skill Block Rate
- Critical Damage
- Movement Speed
- Stun / slow value
- Max HP
- Skill Block
- Block
- Dodge
- Resistance
- Stun Duration Reduction
- Slow Duration Reduction
- Damage Taken Reduction
Use PvP Control Archer when:
- PvP starts
- You are farming in risky maps
- Siege fight begins
- Enemy players can jump you
- You need to kill priority targets
- You need to slow enemies for your party
- You need to survive long enough to kite
Archer should not run first into enemies.
Correct PvP position:
- Stay behind front-line classes.
- Attack from range.
- Slow enemies trying to push.
- Burst low-defense targets.
- Switch survival gear when focused.
- Move before melee classes reach you.
PvP Control Archer Skills
Important PvP skills:
| Skill | Use |
|---|---|
| Forces of Nature | Slow and pressure |
| Snare Shot | Control and kite tool |
| Chain Action | Damage and slow value |
| Blinding Strike | Reduces enemy attack success |
| Magic Arrow | Stun pressure |
| Heavy Hand | Strong control against attack speed / cast speed users |
| Helpless | Debuffs defense and resistances |
| Sharp Shooter | Accuracy and dodge |
| Far Sight | Range advantage |
| Rock Skin | Survival |
| Dash | Escape and reposition |
| Triple Shot | Burst |
| Sniper Shot | Heavy target pressure |
| Charge Shot | Burst |
| Arrow Hail / Phoenix | Group pressure |
| Scorpion Trap | Rank 5 control direction |
| Cloud of Arrows | Rank 5 group damage direction |
| Illusion Stride | Rank 5 movement/survival direction |
| Slight of Bow | Rank 5 Archer value direction |
PvP Archer has one job:
Keep distance and make enemies pay for chasing you.
If a melee class reaches you for free, you already played the fight wrong.
PvP Archer Job
Your PvP job:
| Situation | What to do |
|---|---|
| Enemy is running at you | Slow with Forces of Nature / Snare / Chain Action |
| Enemy damage dealer is exposed | Burst with Triple Shot / Sniper Shot / Magic Arrow |
| Enemy has high defense | Use Helpless before burst |
| Enemy hits too often | Use Blinding Strike |
| Enemy relies on attack speed/cast speed | Use Heavy Hand |
| You are focused | Switch Hybrid/PvP gear and kite |
| Your party is pushing | Use slows and burst on priority target |
| You are out of position | Dash back and reset range |
PvP flow:
- Start in PvP or Hybrid gear.
- Stay behind stronger allies.
- Keep Far Sight, Sharp Shooter, and Rock Skin active.
- Slow the first enemy that pushes.
- Debuff key target with Helpless or Blinding Strike.
- Burst with Triple Shot, Magic Arrow, Sniper Shot, or Charge Shot.
- Move back before melee reaches you.
- Switch survival gear if focused.
Do not tunnel one target while enemies are moving toward you.
Range is your defense.
Hybrid Archer
Hybrid Archer is for dangerous farming.
Use Hybrid Archer when Full Damage kills fast but dies too often.
Best places for Hybrid Archer:
- Shinewood
- Heaven’s Hell
- Rifts
- Firmament
- Monster Hunt
- Open-world farming with PvP risk
- Boss areas
- Any zone where mobs reach you before dying
Hybrid Archer does not mean low damage. It means you keep the damage core but add enough survival to keep farming.
Hybrid setup idea:
| Slot | Choice |
|---|---|
| Rings | One damage ring + one survival/rank ring |
| Necklace | Excellent Faren, Excellent Norgen, Werewolf, or Excellent Hwaridun |
| Oread | Helike for damage, Adrasteia/Ida for survival |
| Stones | Might for damage, Stamina if dying |
| Gear switch | Damage ↔ Hybrid/PvP |
Good Hybrid examples:
- Glorious Bellos + Excellent Gadius
- Glorious Feathered + Excellent Feathered
- Glorious Feathered + Sentinel
- Excellent Faren Necklace
- Werewolf Necklace if you need block/movement
- Excellent Norgen if you need rank and safer stats
Hybrid Archer is the setup that lets you continue farming when full damage starts failing.
Archer Leveling Guide
Archer should level mostly as Full Damage Archer.
Switch to Hybrid only when mobs hit too hard or PvP risk is high.
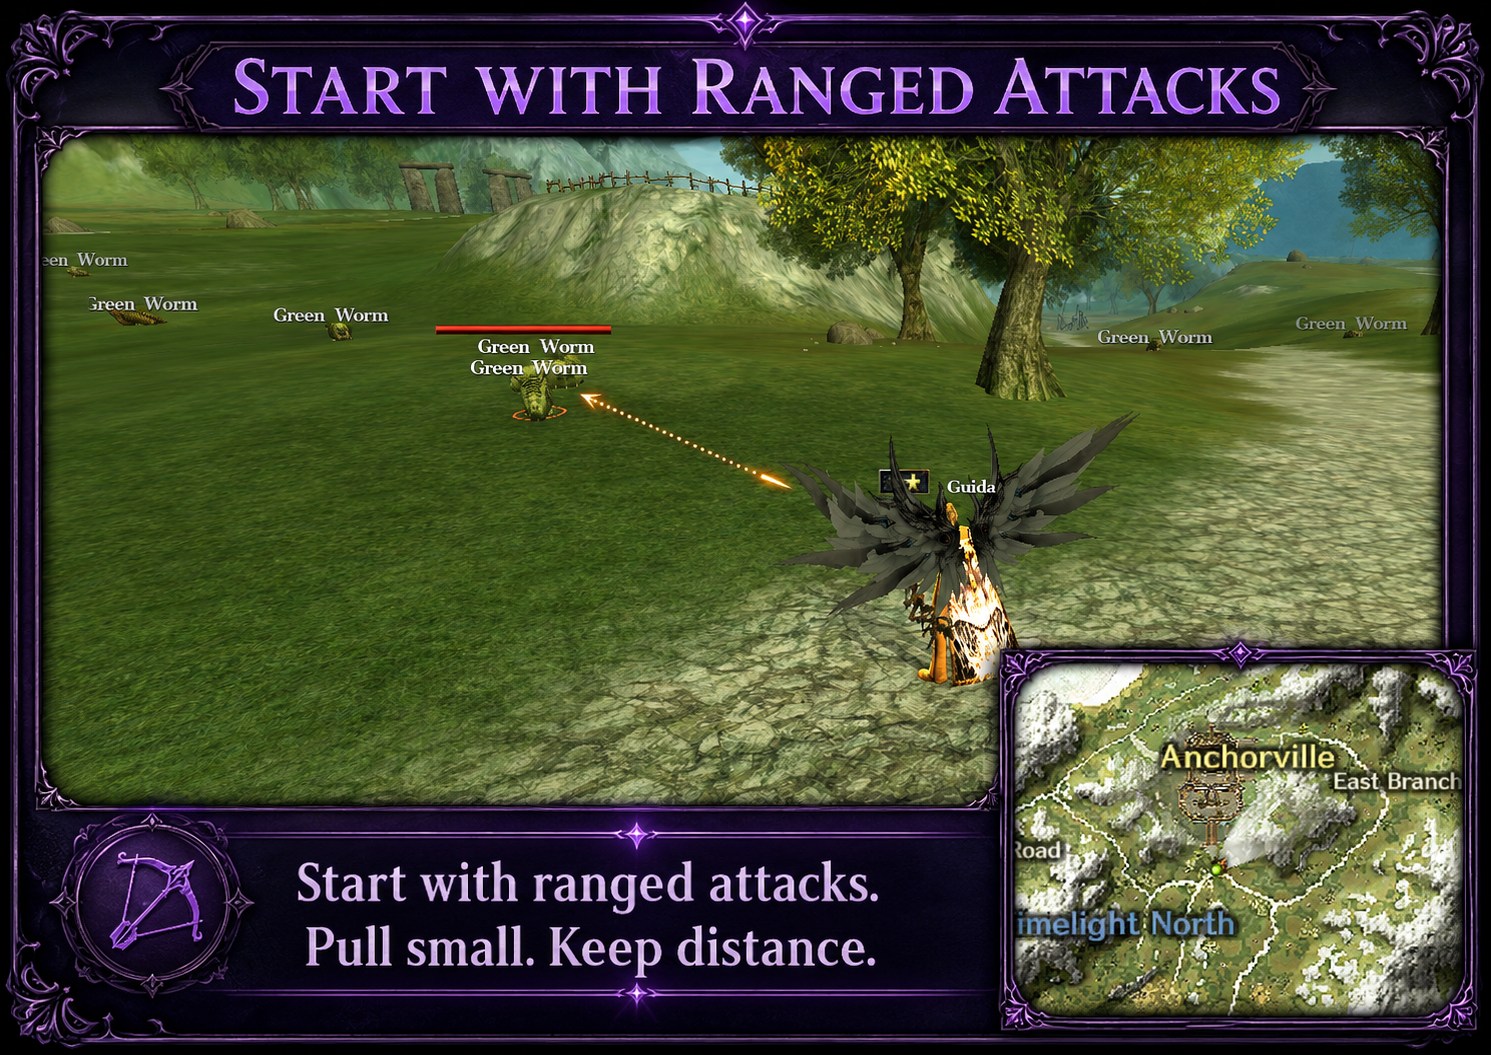
Levels 1 to 11
Start outside Anchorville.
Kill low-level monsters near the city.
Use ranged skills. Pull one or two mobs first. Do not stand inside monster groups.
Goals:
- Equip starter gear.
- Activate pet.
- Use Lens Stone+.
- Use Compound Potion.
- Keep potions ready.
- Learn early bow/crossbow skills.
- Practice keeping distance.
Good early habit:
Attack from range, step back, attack again.
Levels 13 to 24
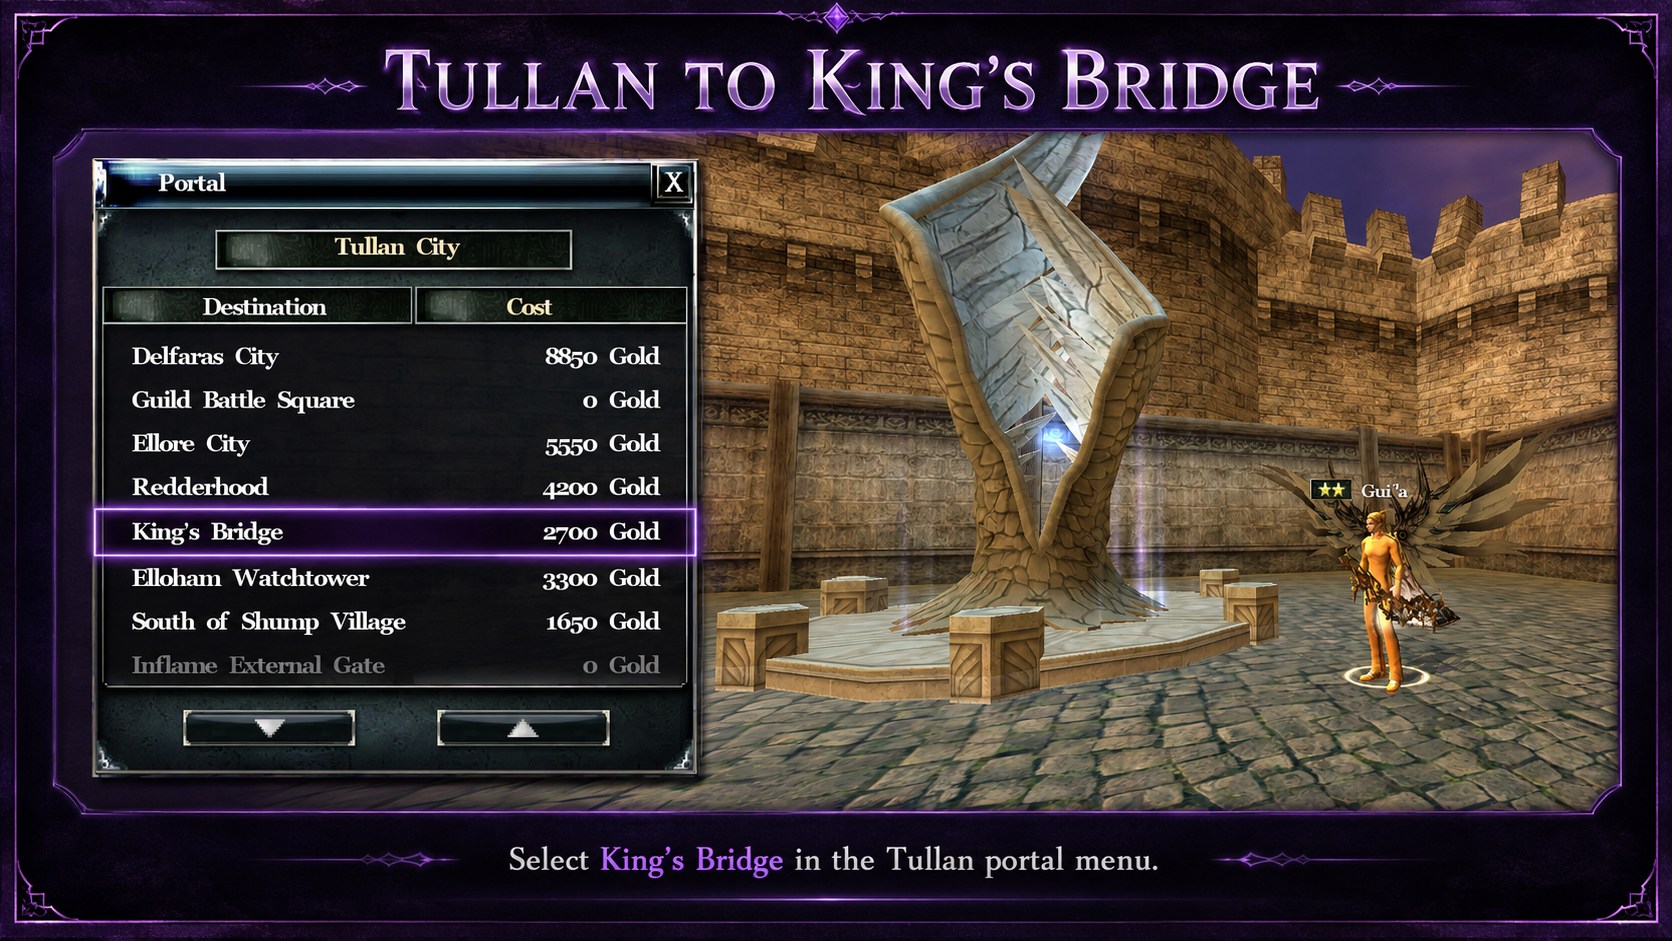
Go to Tullan.
From Tullan, use the portal and select King’s Bridge.
Enter the dungeon and farm monsters inside.
The mobs are stronger than the starter area, so do not run into a full room.
Goals:
- Reach Tullan.
- Open portal.
- Select King’s Bridge.
- Enter dungeon.
- Farm small groups.
- Use AoE when available.
- Keep buffs active.
- Upgrade weapon if mobs die slowly.
Archer advice:
Use range before mobs reach you. If you pull too much, move back and reset.
Levels 31 to 48
Return to Tullan.
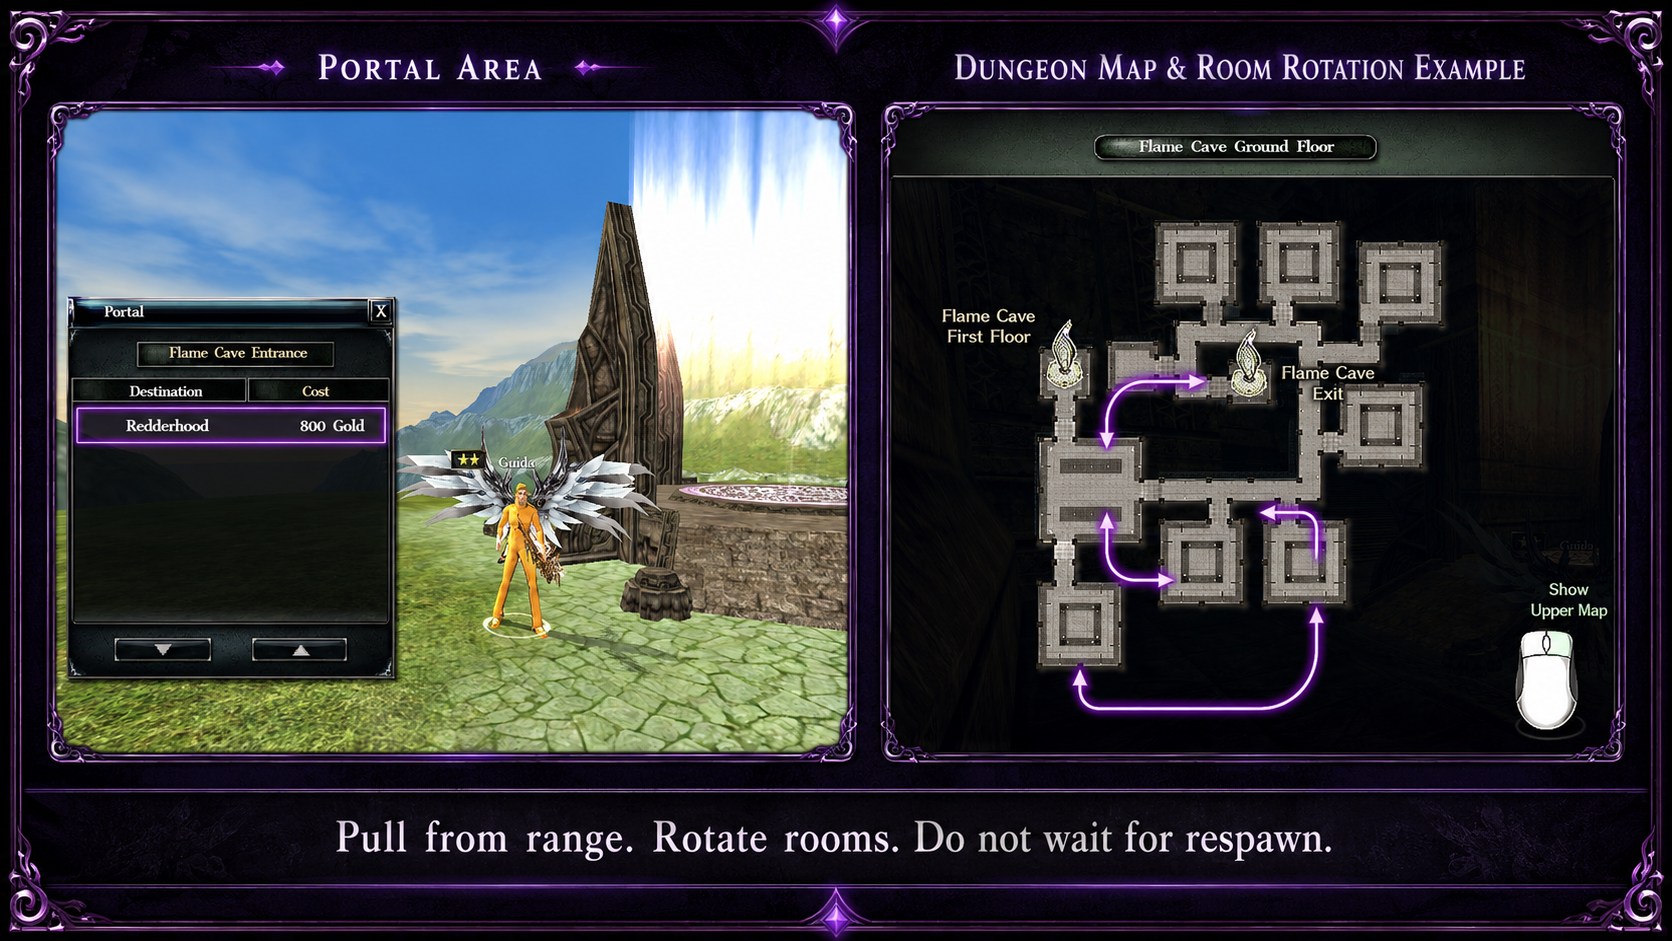
Use teleport/portal to Redderhood.
Enter the second dungeon and rotate rooms.
This is where Archer starts feeling better because range, damage, and control become more useful.
Focus on:
- Better bow or crossbow
- Attack speed
- Attack rating
- Good necklace
- Safe room rotation
- Pulling from the edge of the room
Goals:
- Reach Redderhood.
- Enter the dungeon.
- Rotate rooms instead of waiting in one room.
- Pull mobs from range.
- Slow enemies before they reach you.
- Upgrade weapon if kills are slow.
Useful item direction:
- Karkaen Necklace early for skill rank
- Pargon / Logo style rings if available
- Guardimesh later for attack speed
Levels 48 to 54
Use Asylum Passport from level-up rewards.
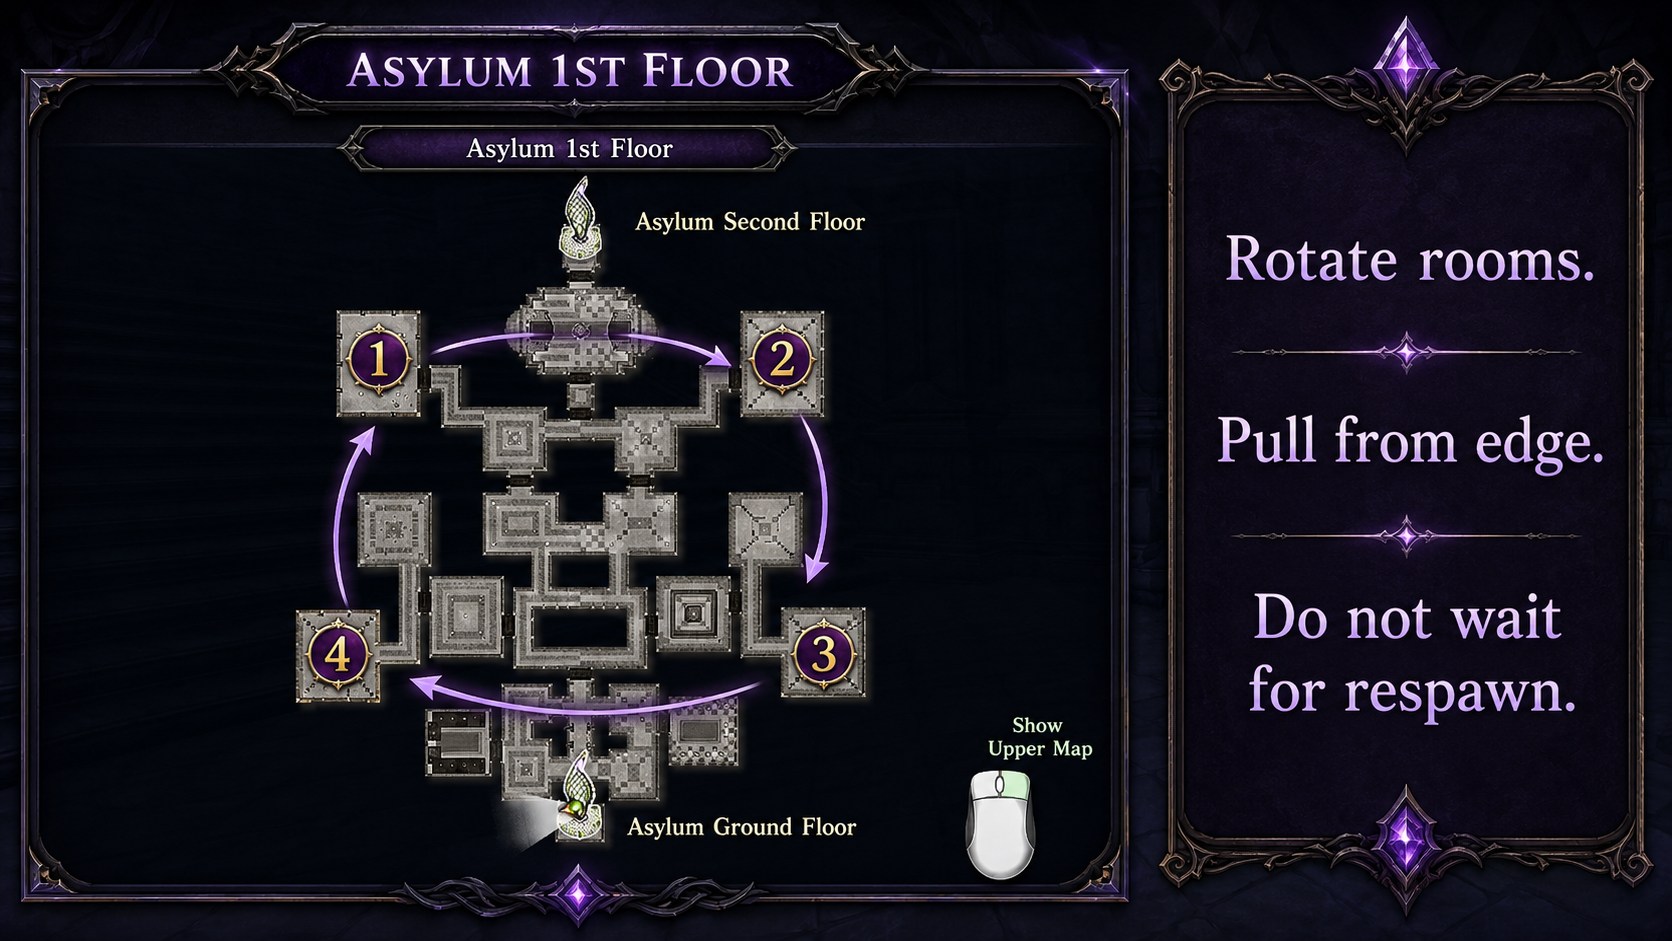
Go to Asylum First Floor.
Farm by rotating between the main rooms.
Archer can farm safely here if you do not overpull. Use range and room edges.
Goals:
- Use Asylum Passport.
- Enter Asylum First Floor.
- Rotate between rooms.
- Pull mobs from edge.
- Keep Lens Stone+ and Compound Potion active.
- Avoid huge pulls if armor is weak.
Archer advice:
Do not stand in the center of the room while mobs surround you. Stand near an edge, pull, slow, kill, move.
Levels 54 to 67
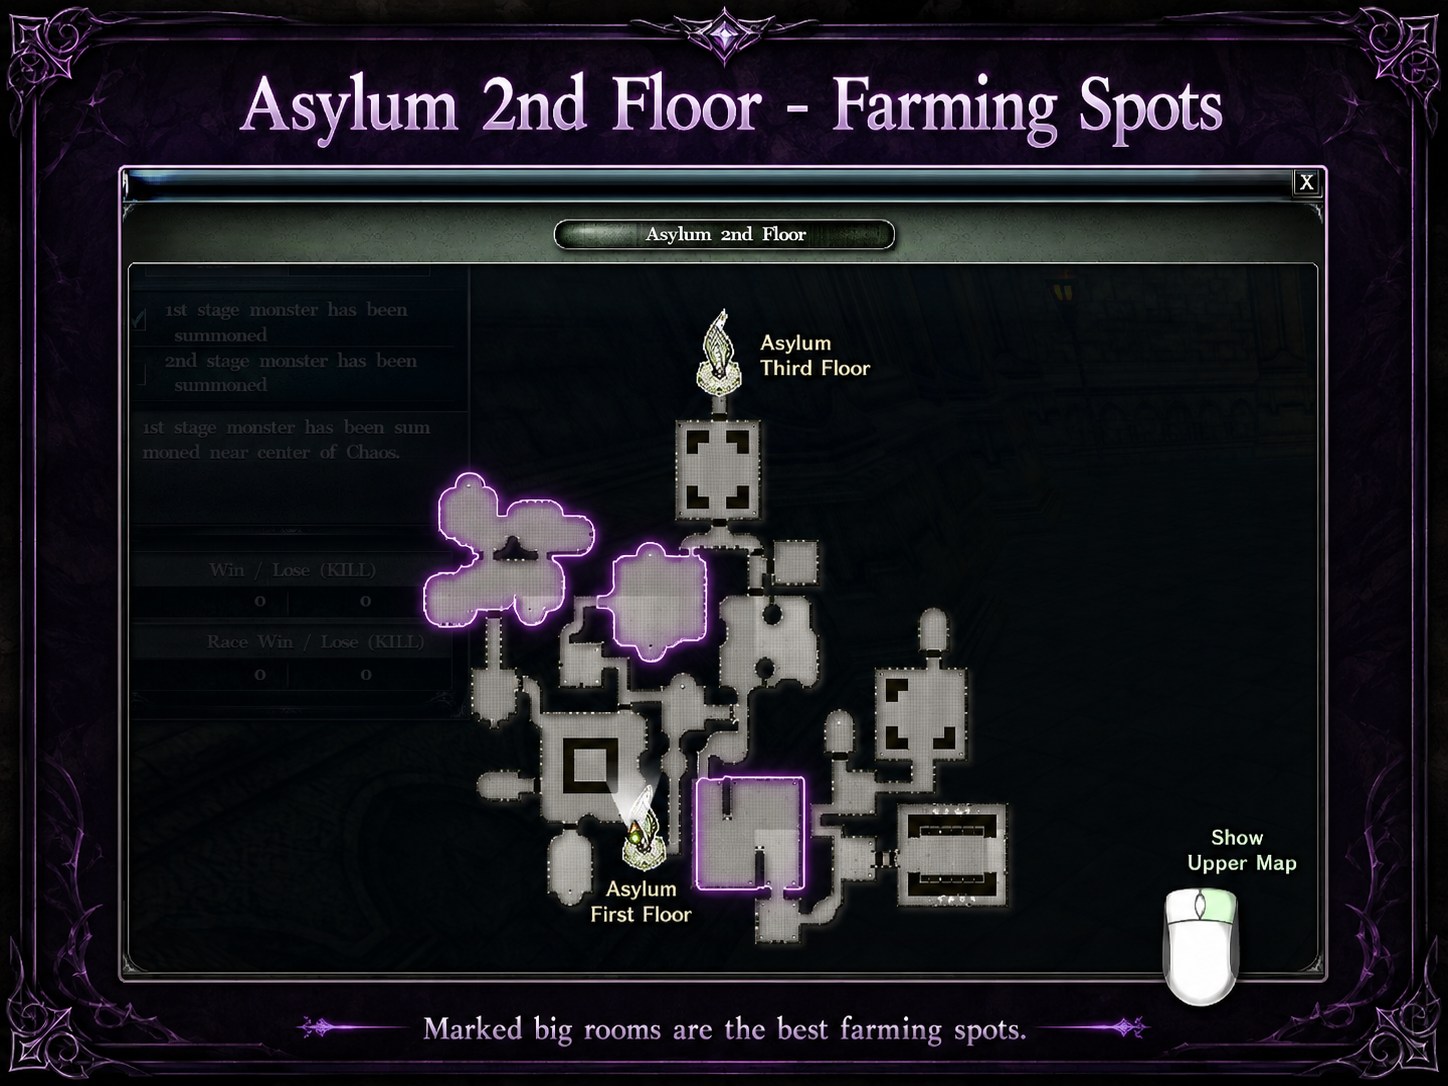
Move to Asylum Second Floor.
Farm Succubus monsters and big rooms.
This is a good stage to improve your weapon and attack speed.
Good item direction:
- Biglos if you need cast/cooldown comfort
- Guardimesh for attack speed and movement
- Better weapon
- Damage rings
- Might stones for damage
Goals:
- Farm Succubus.
- Rotate big rooms.
- Use slows before damage skills.
- Improve weapon if damage is low.
- Start building Full Damage Archer setup.
Archer advice:
Use Far Sight and slows. Kill from outside the monster pack. If mobs touch you too often, your pull is too large or your damage is too low.
Levels 67 to 70
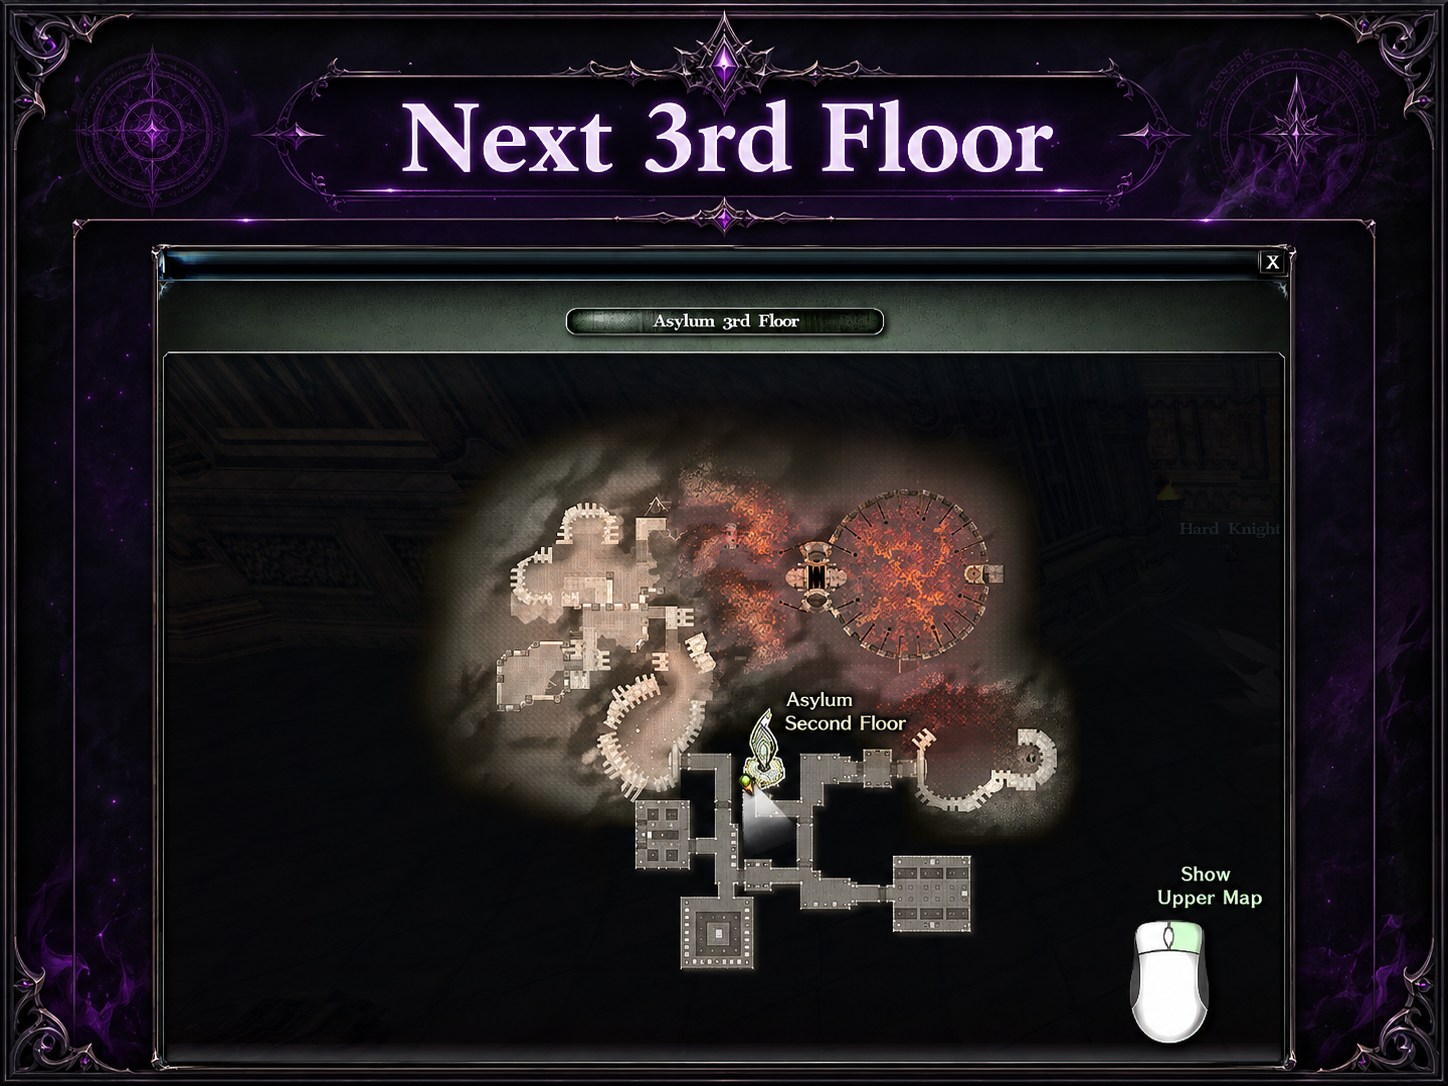
Move to Asylum Third Floor.
Mobs hit harder here.
Start with smaller pulls.
Use slows if mobs reach you too fast:
- Forces of Nature
- Snare Shot
- Chain Action
- Heavy Hand if needed
- Dash to move back
Goals:
- Farm safely.
- Pull small groups first.
- Use slow before burst.
- Prepare for Realm leveling at 70.
Archer advice:
This is the last step before Realms. If you die too much here, upgrade your weapon, armor stones, or use one safer accessory before moving forward.
How to Reach Realm Maps After Level 70
After level 70, your main route changes.
You should move through:
- Ice Realm / Frozen Infinity
- Lightning Realm / Teslon Outpost
- Poison Realm / Evergreen Paradise
- Shinewood / Ellore
- Heaven’s Hell World
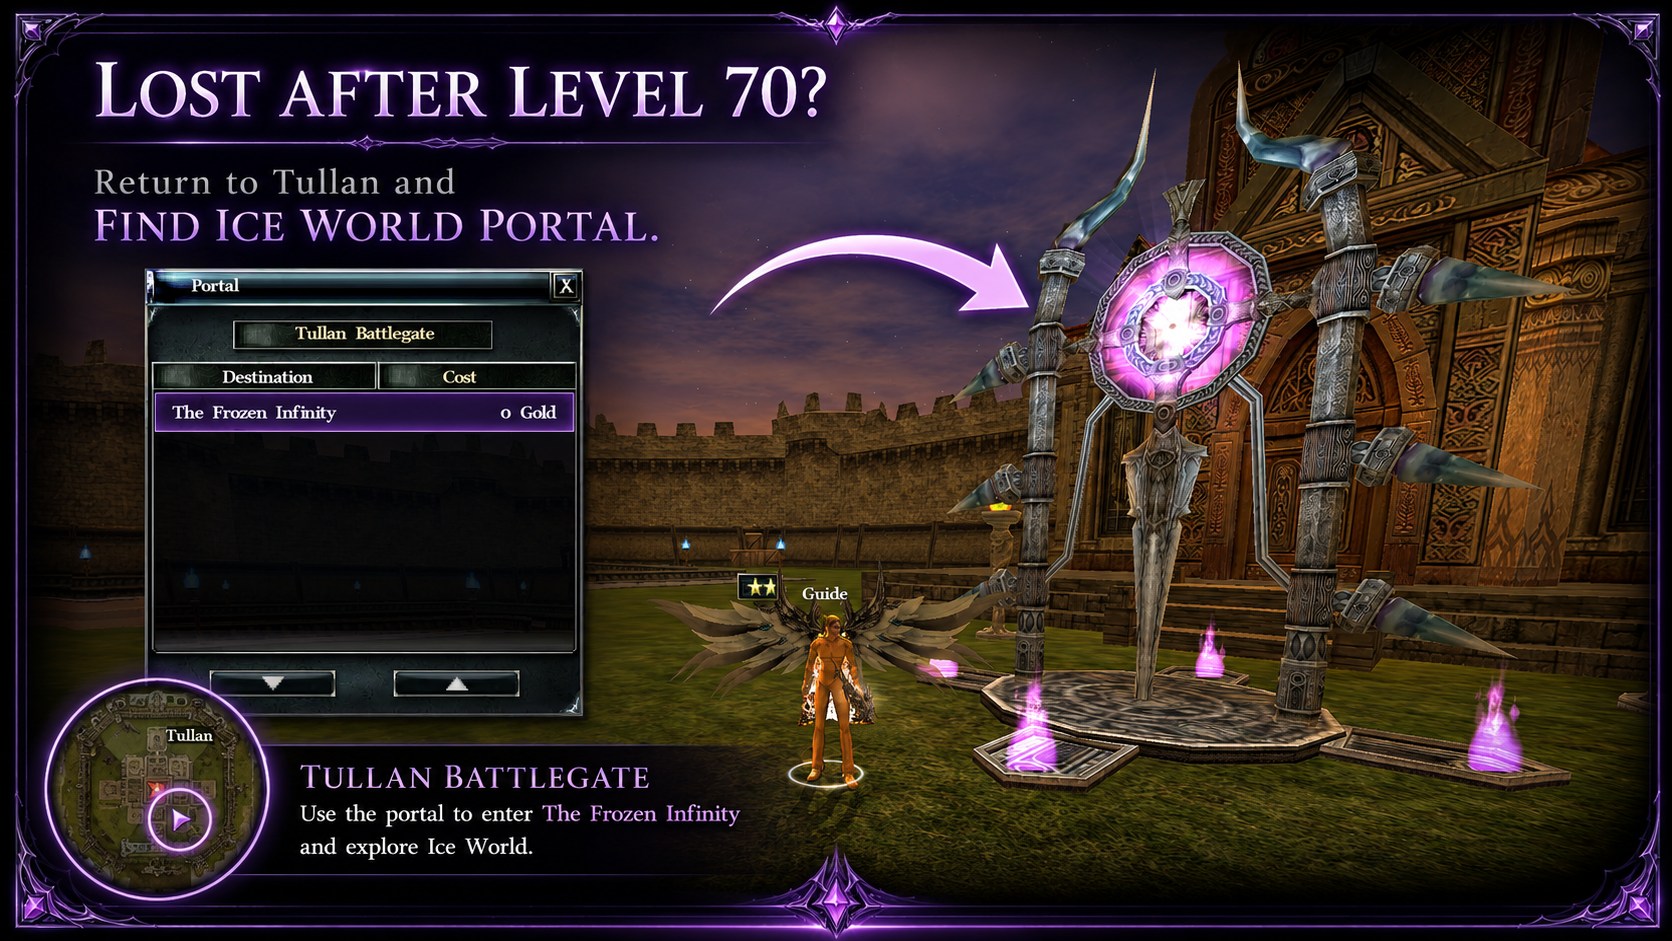
If you are lost, return to Tullan.
Tullan is the main travel city for this stage.
Basic travel rule:
- Return to Tullan.
- Find the Ice World / Realm portal area.
- Open the portal menu.
- Select the map for your level.
- Farm and complete the quest.
- Return to portal when you reach the next level step.
If the portal menu is grouped by world, choose the world first, then the map.
Example:
- Realm World → Frozen Infinity
- Realm World → Teslon Outpost
- Realm World → Evergreen Paradise
- Shinewood → Ellore
- Heaven’s Hell → Flames of Hell
Levels 70 to 120
Recommended path:
| Level | Area | Why you go there |
|---|---|---|
| 70 to 75 | Ice Realm / Frozen Infinity | Leveling, Ohkeros Rings, event mobs when active |
| 75 to 80 | Lightning Realm / Teslon Outpost | Leveling, Shocker Necklaces, event mobs when active |
| 80 to 99 | Poison Realm / Evergreen Paradise | Leveling, Gadius/Gaudius Rings, Luke Necklaces, event mobs when active |
| 99+ | Shinewood / Ellore | Leveling, quests, materials, Realm progression, HH preparation |
| 100 to 106 | Heaven’s Hell / Flames of Hell | Start HH progression and HH armor path |
| 106 to 113 | Heaven’s Hell / Bloodline of Life | Stronger HH leveling, Monster Hunt event area |
| 113 to 120 | Heaven’s Hell / Blade Storm Mountain | Final leveling path toward 120 |
After level 70, do not only think about XP.
You also need:
- Rings
- Necklaces
- Materials
- Better weapon
- Better armor stones
- Gear switch
- HH armor progress
- Oreads later
- Nightfall progress later
Levels 70 to 75: Ice Realm / Frozen Infinity
At level 70, return to Tullan.
Open the portal menu and select Ice Realm / Frozen Infinity. The menu may display it as The Frozen Infinity.
This is your first Realm leveling map.
What to do:
- Enter Frozen Infinity.
- Find Arctic Wretch mobs.
- Start with small pulls.
- Use slow before mobs reach you.
- Use damage skills after mobs are controlled.
- Complete the level 70 Realm quest when possible.
- Farm until level 75.
Main reward:
- Ohkeros Rings
Archer use:
| Item | Use |
|---|---|
| Glorious Ohkeros | Damage and hit-effect direction |
| Excellent Ohkeros | Skill-rank / buff setup |
| Intelligent Ohkeros | All-stats direction, not main physical meta |
| Other Ohkeros | Temporary until better rings |
Why Ohkeros matters:
- Good mid-game damage ring
- Cooldown value
- Useful until stronger damage rings
Event mob note:
If boosted event mobs spawn in Ice Realm, use them for faster leveling only if you can survive.
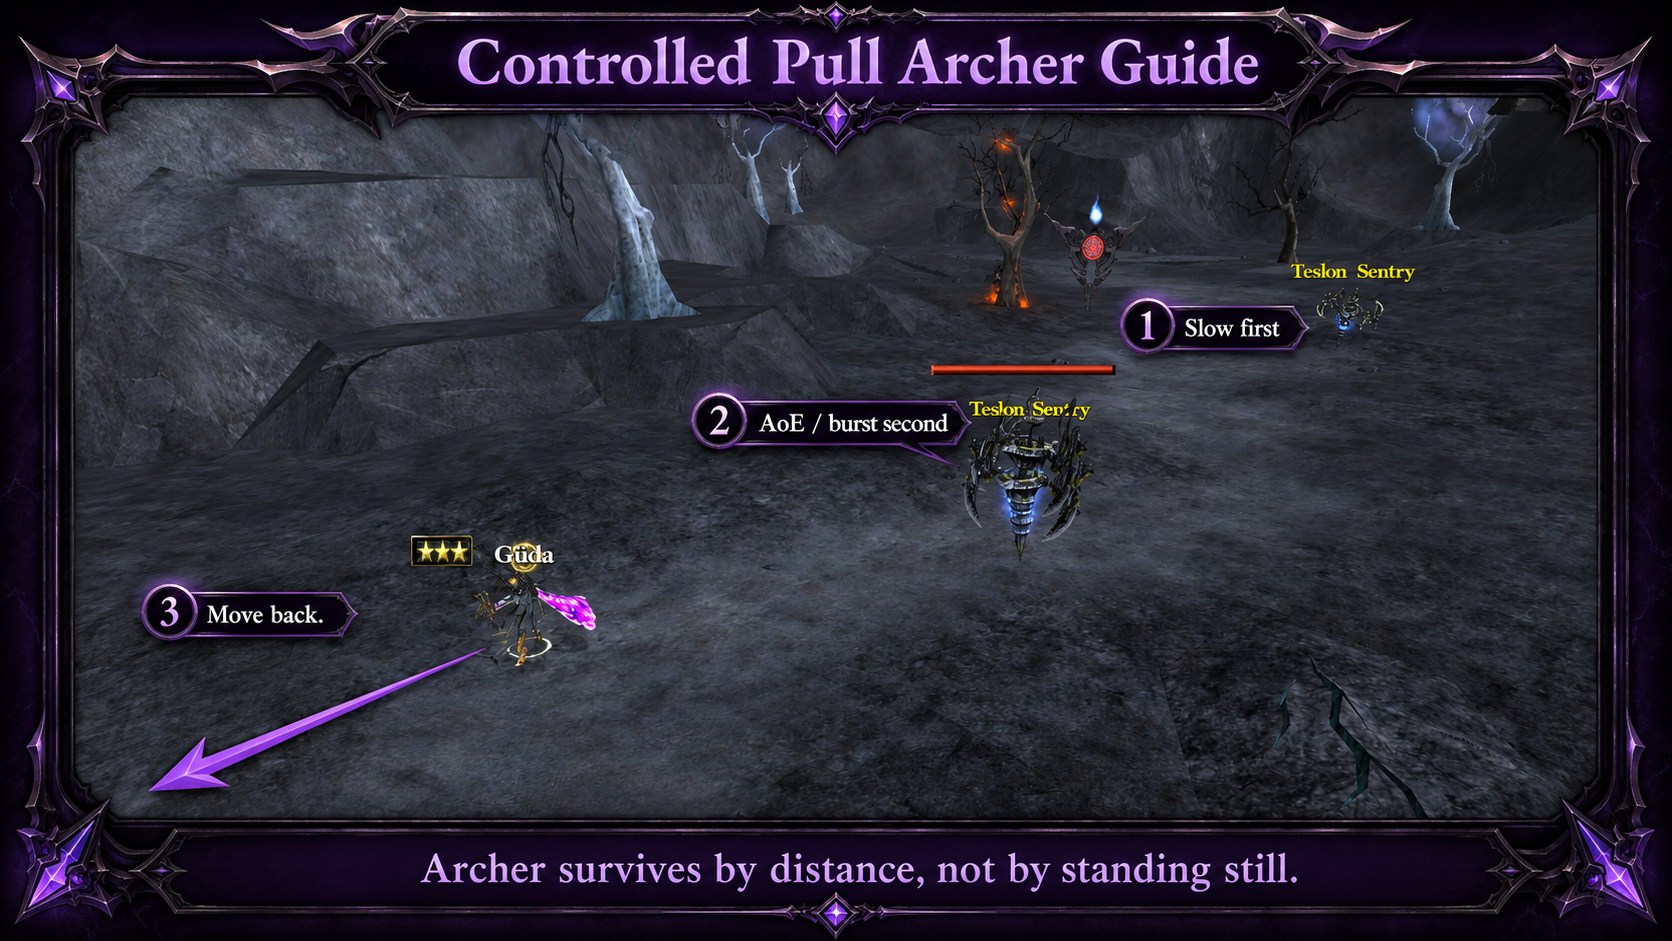
Safe Archer method:
- Stand at the edge of the spawn.
- Pull a medium group.
- Slow first.
- AoE / burst second.
- Move back.
- Repeat.
Do not run into the middle of the event mobs.
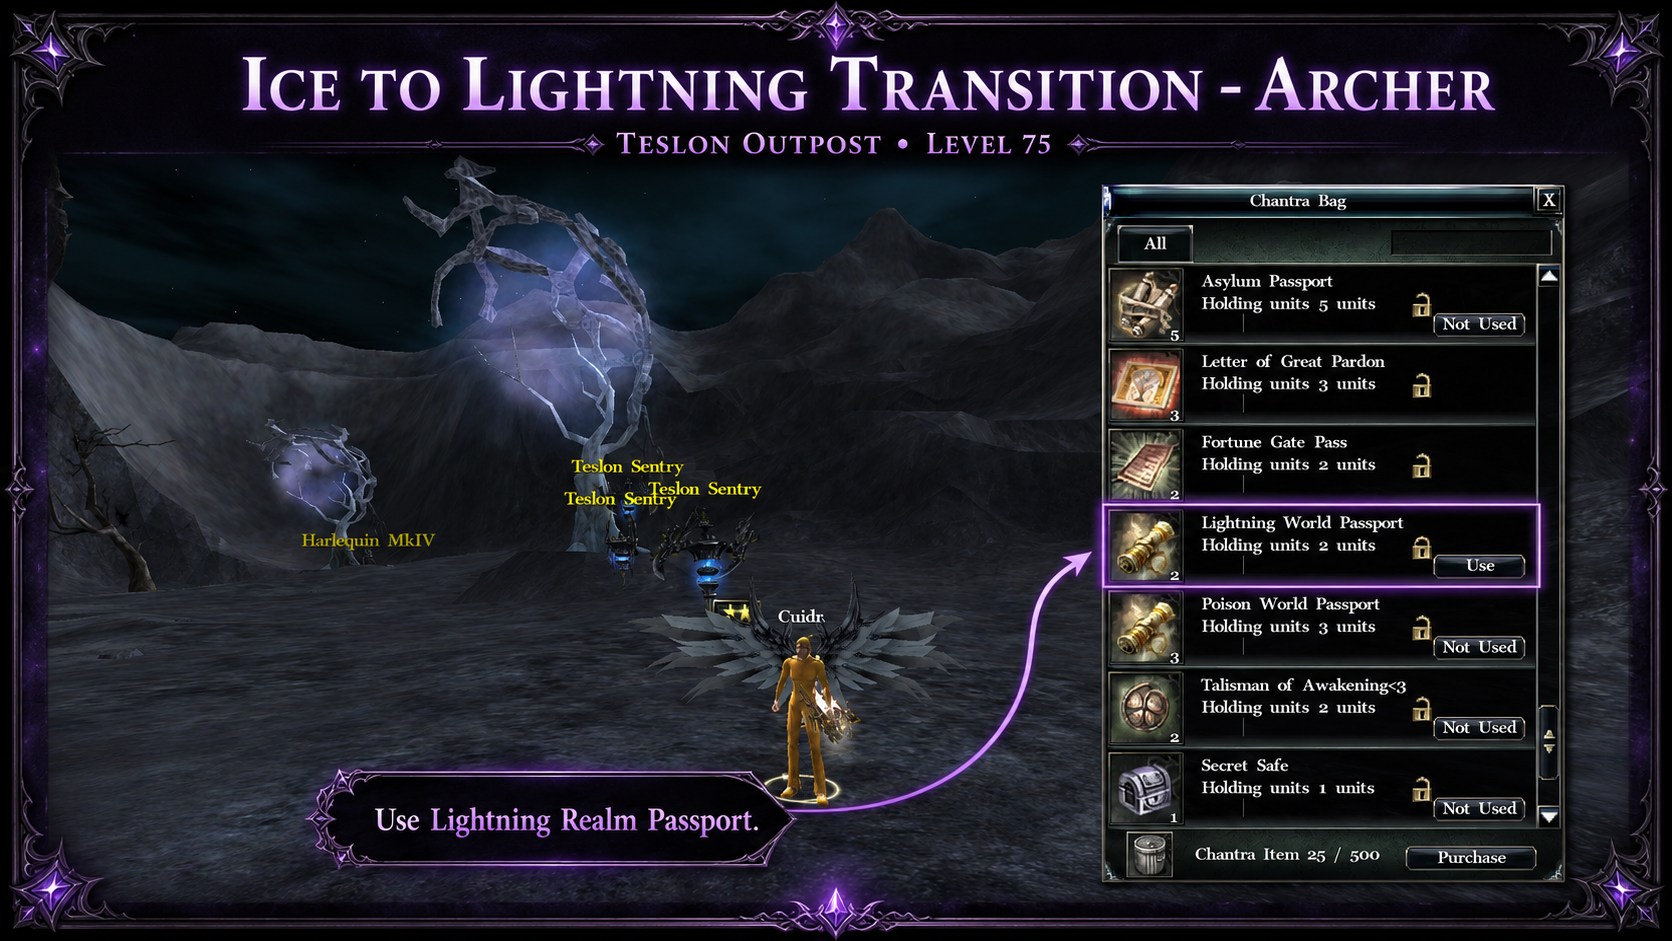
Levels 75 to 80: Lightning Realm / Teslon Outpost
At level 75, leave Ice Realm.
Return to Tullan portal area.
Open the same portal menu and select Lightning Realm / Teslon Outpost.
What to do:
- Finish your current Ice Realm pull.
- Return to town.
- Go to Tullan portal.
- Select Teslon Outpost.
- Enter Lightning Realm.
- Farm Teslon Sentry mobs.
- Complete the level 75 Realm quest.
- Farm until level 80.
Main reward:
- Shocker Necklace
Archer use:
Shocker Necklace is a temporary necklace. It can help while progressing, but it is not your final necklace.
Later, Archer should move toward:
- Luke Necklace for mid-game skill rank
- Excellent Hwaridun for ignore defense / attack speed / +rank
- Excellent Norgen for safer rank setup
- Excellent Faren as the main final necklace
Event mob note:
If boosted event mobs spawn in Lightning Realm, use them, but control the pull.
Use:
- Forces of Nature
- Snare Shot
- Chain Action
- Heavy Hand if needed
- Dash to move back
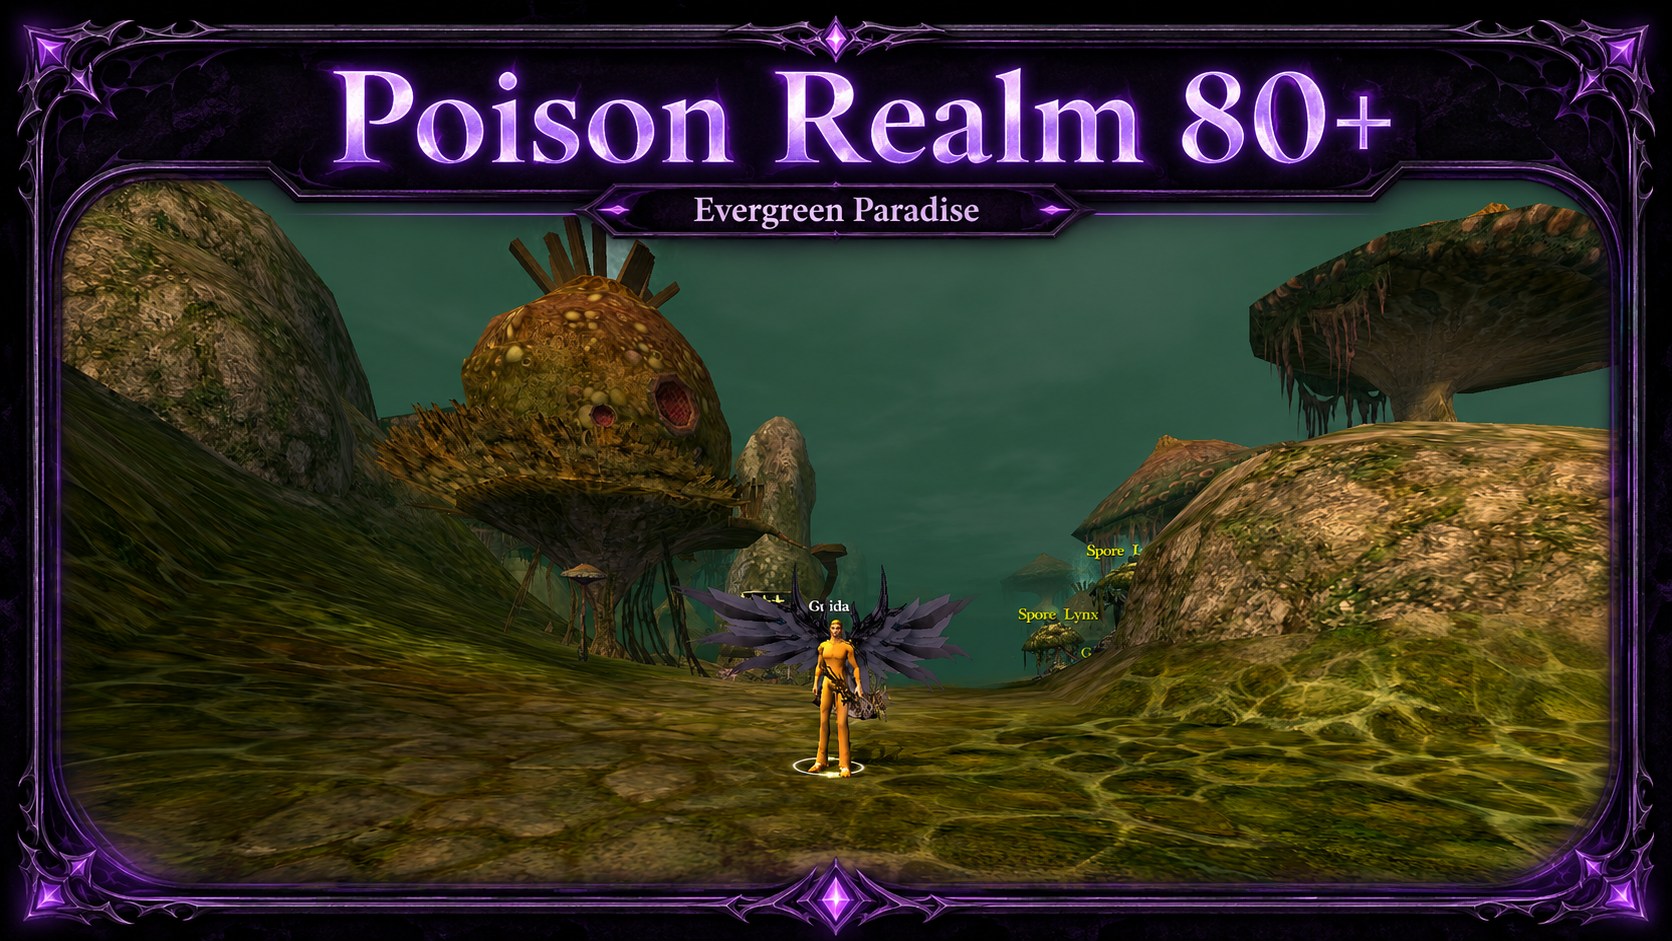
Levels 80 to 99: Poison Realm / Evergreen Paradise
At level 80, leave Lightning Realm.
Return to Tullan portal area.
Open the portal menu and select Poison Realm / Evergreen Paradise.
What to do:
- Stop farming Lightning when you reach level 80.
- Return to Tullan.
- Open the portal menu.
- Select Evergreen Paradise.
- Enter Poison Realm.
- Farm Spore Lynx and Plaguefish.
- Complete the level 80 Realm quests.
- Stay here until you are ready for Shinewood.
Main rewards:
- Gadius/Gaudius Rings
- Luke Necklaces
Archer use:
| Reward | Archer use |
|---|---|
| Gadius/Gaudius Ring | Hybrid, PvP, safer farming, buff setup |
| Luke Necklace | Good mid-game necklace with skill rank |
Luke is useful for Archer because learned skill rank helps your damage and buffs.
Gadius/Gaudius is not your main damage ring, but it is useful when mobs hit too hard or PvP happens.
Poison Realm is where you start preparing two setups:
- Full Damage setup for farming
- Hybrid/PvP setup for survival
Event mob note:
If boosted event mobs spawn in Poison Realm, prioritize them if you can survive.
Archer event farming rule:
- Do not stand inside the full spawn.
- Pull from the edge.
- Slow first.
- Damage second.
- Move after casting.
- Switch to Hybrid gear if damage taken is high.
Simple Realm Switching Rule
Use this rule if you get lost:
| Your level | Go here | What to do |
|---|---|---|
| 70 | Ice Realm / Frozen Infinity | Use Tullan portal and select Ice Realm |
| 75 | Lightning Realm / Teslon Outpost | Return to portal and select Lightning Realm |
| 80 | Poison Realm / Evergreen Paradise | Return to portal and select Poison Realm |
| 99+ | Shinewood / Ellore | Move to Shinewood and start Ellore quests |
Do not stay in the old map too long.
When you reach the next level step, return to the portal and move forward.
Realm Monster Hunt / Boosted Event Mobs
When Monster Hunt or boosted event mobs are active in Realm maps, prioritize them if your Archer can survive.
Archer is strong during event spawns because:
- Range lets you start damage safely.
- Slows let you control mobs.
- AoE and multi-hit skills clear packs.
- Boosted mobs speed up leveling.
- Event windows are better than normal slow farming.
But event mobs are dangerous.
Do not pull the whole spawn in Full Damage gear if your armor is weak.
Safe event method:
- Stand at the edge of the spawn.
- Pull a medium group.
- Slow with Forces of Nature / Snare Shot / Chain Action.
- Use Arrow Hail / Phoenix after mobs group up.
- Burst stronger mobs with Triple Shot / Magic Arrow / Sniper Shot.
- Move before they surround you.
- Switch to Hybrid gear if needed.
Bad event method:
- Running into the middle of the spawn.
- Pulling everything at once.
- Fighting while surrounded.
- Forgetting buffs.
- Staying still while mobs hit you.
- Not switching gear when focused.

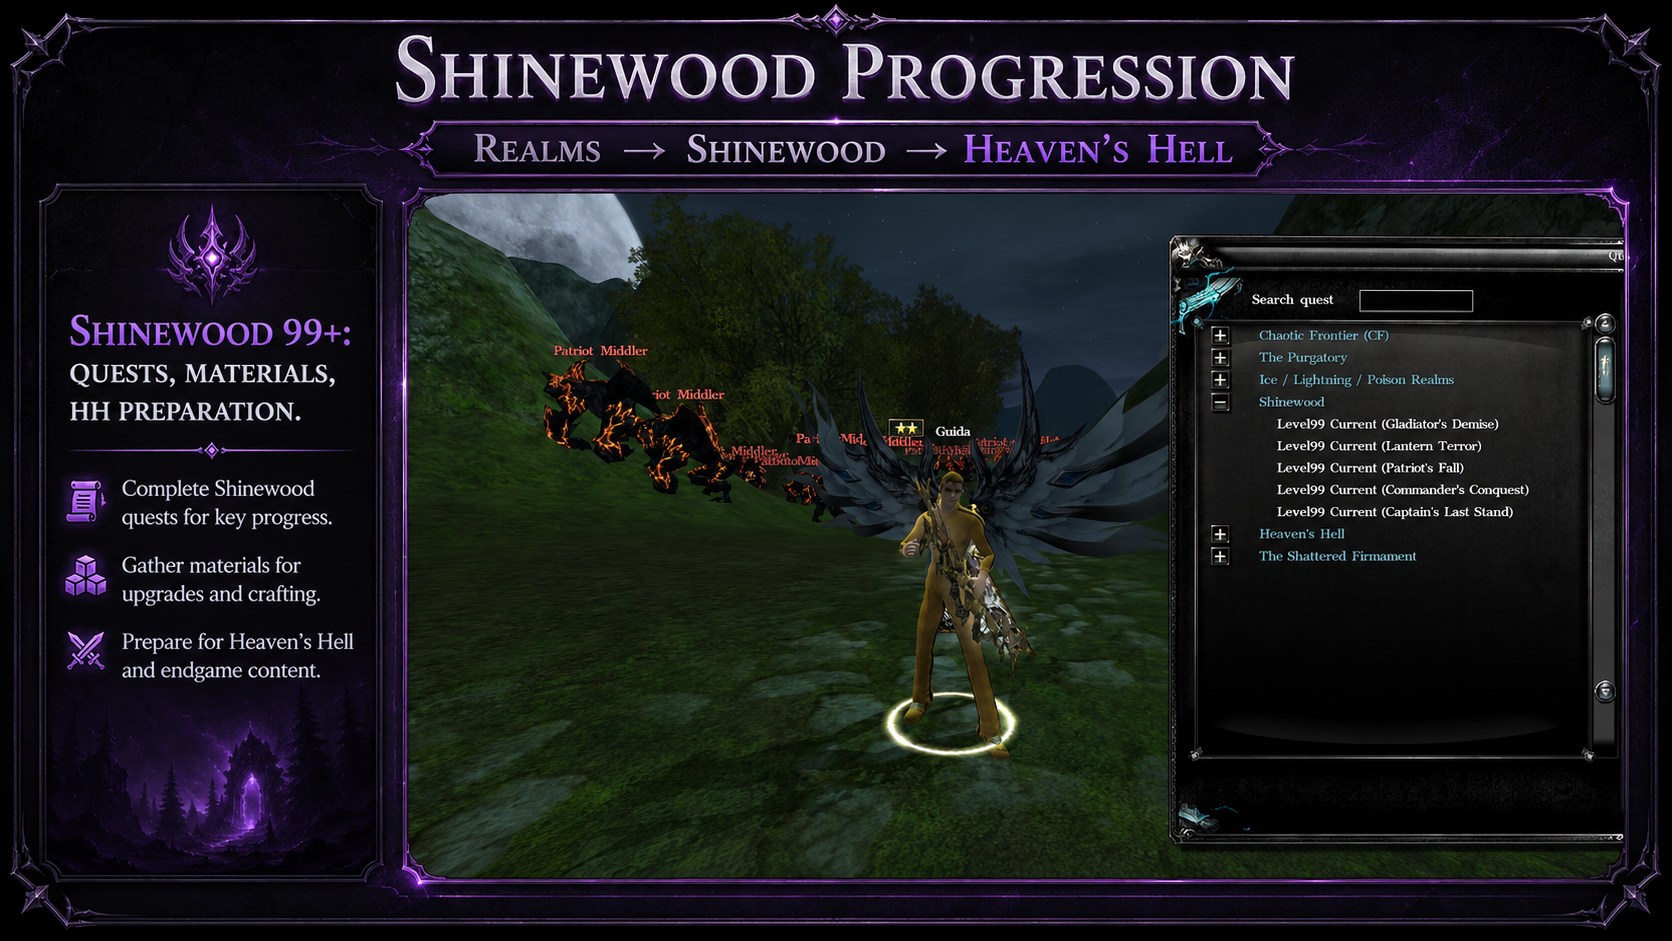
Level 99+: Shinewood / Ellore
At level 99, stop using Realm maps as your main path.
Move to Shinewood / Ellore.
How to reach Shinewood:
- Finish your Realm farming.
- Return to Tullan or main city.
- Open the city/world portal.
- Select Shinewood or Ellore.
- Enter Shinewood.
- Find the Ellore quest area.
- Start Shinewood quests.
- Farm nearby mobs and collect materials.
If the portal menu uses map groups, look for Shinewood first, then Ellore.
Why Archer goes to Shinewood:
- Realms become slower later.
- Shinewood gives better progression after level 99.
- Shinewood quests give useful materials.
- You prepare for Heaven’s Hell.
- You work toward Realm and gear progression.
- You start needing proper Damage ↔ Hybrid switching.
- You test whether your Archer is ready for HH.
Useful Shinewood quest rewards include:
- Shard of Rebirth
- Tempering Gems
Before Shinewood, prepare:
- Stronger bow or crossbow
- Damage rings
- Good necklace
- Armor with useful stones
- Pet active
- Lens Stone+
- Compound Potion
- Damage ↔ Hybrid gear switch
- Buff ↔ Fight switch
- Enough potions
Good Archer skills in Shinewood:
- Forces of Nature
- Snare Shot
- Chain Action
- Arrow Hail
- Phoenix
- Triple Shot
- Magic Arrow
- Blinding Strike
- Sniper Shot
- Dash
Full Damage Archer farms faster.
Hybrid Archer is safer.
PvP Control Archer is useful if enemies can attack you.
If mobs reach you too fast, slow earlier.
If you still die, switch one or two items into survival gear.
Level 100+: Heaven’s Hell World
At level 100, start Heaven’s Hell progression.
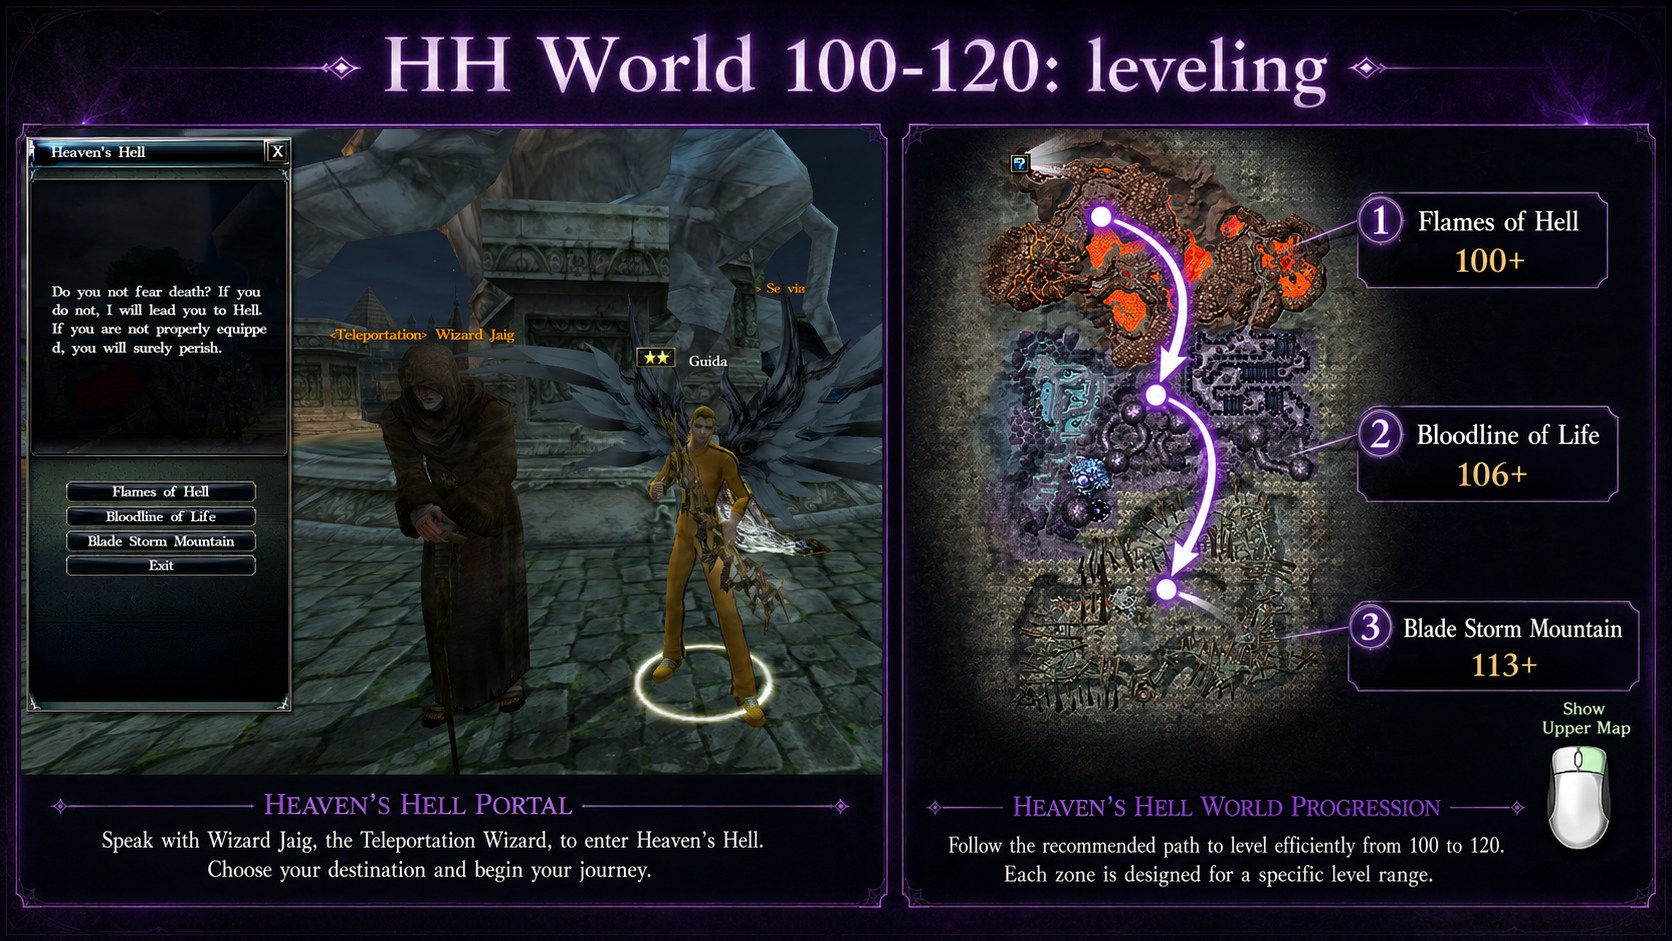
Do not enter HH like a normal farming map. HH monsters are stronger and Archer needs better gear.
How to reach Heaven’s Hell:
- Finish your Shinewood preparation.
- Return to the portal area.
- Open the world/zone portal.
- Select Heaven’s Hell.
- Start with Flames of Hell.
- Move to Bloodline of Life at 106+.
- Move to Blade Storm Mountain at 113+.
HH path:
| Level | HH zone | What to do |
|---|---|---|
| 100 to 106 | Flames of Hell | Start HH leveling and quest progression |
| 106 to 113 | Bloodline of Life | Continue HH leveling, join Monster Hunt when active |
| 113 to 120 | Blade Storm Mountain | Final leveling path to 120 |
Why Archer goes to HH:
- Main level 100+ leveling path
- Leads toward HH armor
- HH armor prepares Archer for Nightfall Armor
- HH quests give important rewards
- Monster Hunt can speed up leveling
- Endgame starts here
Before HH, prepare:
- Full Damage gear
- Hybrid / PvP survival gear
- Damage ↔ Hybrid switch
- Buff ↔ Fight switch
- Good weapon
- Good rings
- Good necklace
- Armor with useful Archer yellows
- Better stones
- Potions
- Correct Oread if available
Full Damage Archer is best if you survive.
Hybrid Archer is best if Full Damage dies too much.
PvP Control Archer is best when players can attack you.
Flames of Hell: Level 100 to 106
Start here carefully.
What to do:
- Enter Flames of Hell.
- Start with small pulls.
- Test how much damage mobs deal.
- Use Full Damage gear if you survive.
- Use Hybrid gear if damage is too high.
- Complete HH quests when possible.
- Farm until you are ready for Bloodline of Life.
Archer advice:
- Slow before damage.
- Do not stand inside mobs.
- Keep range.
- Dash back if mobs close the gap.
- Switch Hybrid gear if enemies focus you.
Bloodline of Life: Level 106 to 113
Bloodline of Life is harder.
This is also a key Monster Hunt area.
When Monster Hunt is active, additional mobs spawn and give boosted EXP. This is a strong leveling window, but more mobs also means more danger.
What to do:
- Enter Bloodline of Life at 106+.
- Start with smaller pulls.
- Use Full Damage if safe.
- Use Hybrid if mobs hit too hard.
- Use PvP Control setup if PvP starts.
- Join Monster Hunt only if you can survive the extra mobs.
- Farm toward 113.
Monster Hunt method:
- Pull from the edge.
- Slow first.
- Damage second.
- Move constantly.
- Do not stand inside the full spawn.
- Switch Hybrid/PvP gear if focused.
Blade Storm Mountain: Level 113 to 120
Blade Storm Mountain is the final main leveling zone before 120.
Before farming here, prepare:
- Strong weapon
- Good rings
- Good necklace
- Useful armor yellows
- Better stones
- Damage ↔ Hybrid switch
- Buff ↔ Fight switch
- Correct Oread if available
- Potions
- Free inventory space
What to do:
- Enter Blade Storm Mountain at 113+.
- Test a small pull first.
- Use Full Damage if you survive.
- Use Hybrid if Full Damage dies too fast.
- Keep PvP set ready.
- Complete HH quests.
- Farm to level 120.
Archer advice:
Blade Storm Mountain punishes bad positioning. Do not stand still. Use range and movement. If mobs reach you too often, your pull is too large.
HH Armor Goal
Archer should work toward Heaven’s Hell armor.
HH armor matters because:
- It is part of the real endgame armor path.
- It helps Archer survive harder content.
- It gives strong skill value.
- It prepares your armor base before Nightfall.
- Good yellows on HH armor matter later.
Do not rush bad HH pieces if you plan to upgrade later.
Archer needs good yellows.
Bad yellows now can become a problem later when upgrading.
Quick Travel Summary
Use this if you forget where to go.
| Step | Where to go | What to select |
|---|---|---|
| 1 | Tullan | Find city/world/realm portal |
| 2 | Level 70 | Select Ice Realm / Frozen Infinity |
| 3 | Level 75 | Return to portal, select Lightning Realm / Teslon Outpost |
| 4 | Level 80 | Return to portal, select Poison Realm / Evergreen Paradise |
| 5 | Level 99 | Select Shinewood / Ellore |
| 6 | Level 100 | Select Heaven’s Hell / Flames of Hell |
| 7 | Level 106 | Move to Bloodline of Life |
| 8 | Level 113 | Move to Blade Storm Mountain |
| 9 | Level 120 | Start full endgame progression |
Simple rule:
When you finish one level range, return to the portal and select the next map.
Do not stay lost in the same area.
Archer Gear Stats
Archer is not built like a normal crit class.
Do not build Archer around Glorious uniques, critical-only stats, or pure physical damage.
Archer’s main power comes from:
- All Elemental Attacks
- Elemental damage
- Elemental resistance debuffs
- Skill ranks
- Attack speed
- Range
- Control skills
- Movement
- Survival when focused
Glorious uniques are mainly for crit classes.
For Archer, the usual direction is:
- Intelligent uniques for damage while leveling and farming
- Excellent uniques for +skill rank, Max HP, block, skill block, and stronger PvP/survival value
- Excellent Faren Necklace as the main final necklace
Full Damage Archer Stats
Prioritize:
- All Elemental Attacks
- Elemental damage
- Damage
- Heroic Attack Power
- Attack Speed
- Attack Rating
- Skill rank
- Skill cooldown value
- Ignore Elemental Resistance
- Elemental resistance debuff value
- Movement Speed
- All Stats
- Useful weapon damage bonuses
Secondary stats:
- Critical Hit Rate
- Critical Damage
- Ignore Defense
These secondary stats are not useless, but they are not the main Archer direction on Archonia.
Simple rule:
Archer damage comes from elemental pressure, skill value, range, and debuffs. Do not build Archer like a pure crit class.
PvP Control Archer Stats
Prioritize:
- Skill rank
- All Elemental Attacks
- Elemental resistance debuff value
- Attack Speed
- Attack Rating
- Movement Speed
- Max HP
- Skill Block
- Block
- Dodge
- Resistance
- Critical Hit Resistance
- Stun Duration Reduction
- Slow Duration Reduction
- Damage Taken Reduction
- HH Effect Duration Reduction
PvP Archer needs damage, but survival matters a lot.
If you die before you slow, debuff, or burst, your damage setup does not matter.
Hybrid Archer Stats
Prioritize:
- All Elemental Attacks
- Damage
- Attack Speed
- Attack Rating
- Skill rank
- Max HP
- Skill Block
- Block
- Movement Speed
- Resistance
- Stun / slow reduction
Hybrid Archer is the safe farming setup.
Use Hybrid when Full Damage kills fast but dies too often.
Archer Weapons
Archer uses bow or crossbow.
Your weapon matters a lot, but do not judge the weapon only by critical stats.
Weapon focus for Full Damage Archer
Look for:
- Strong base weapon damage
- All Elemental Attacks
- Elemental damage
- Heroic Attack Power
- Damage
- Attack Speed
- Attack Rating
- Skill cooldown value if available
- Ignore Elemental Resistance if available
- Useful bonus stats
- Good reinforcement level
- Good slots
Weapon focus for PvP / Hybrid Archer
Look for:
- Strong base weapon damage
- All Elemental Attacks
- Heroic Attack Power
- Attack Speed
- Attack Rating
- Max HP or defensive bonuses if available
- Skill Block / Block / resistance if available
- Useful debuff-related stats
- Good reinforcement level
- Good slots
Bow or Crossbow
| Weapon | Best use | Important buff |
|---|---|---|
| Bow | Smoother farming, safer ranged play, better comfort | Power Bow |
| Crossbow | Heavier burst, stronger single-target pressure | Power Crossbow |
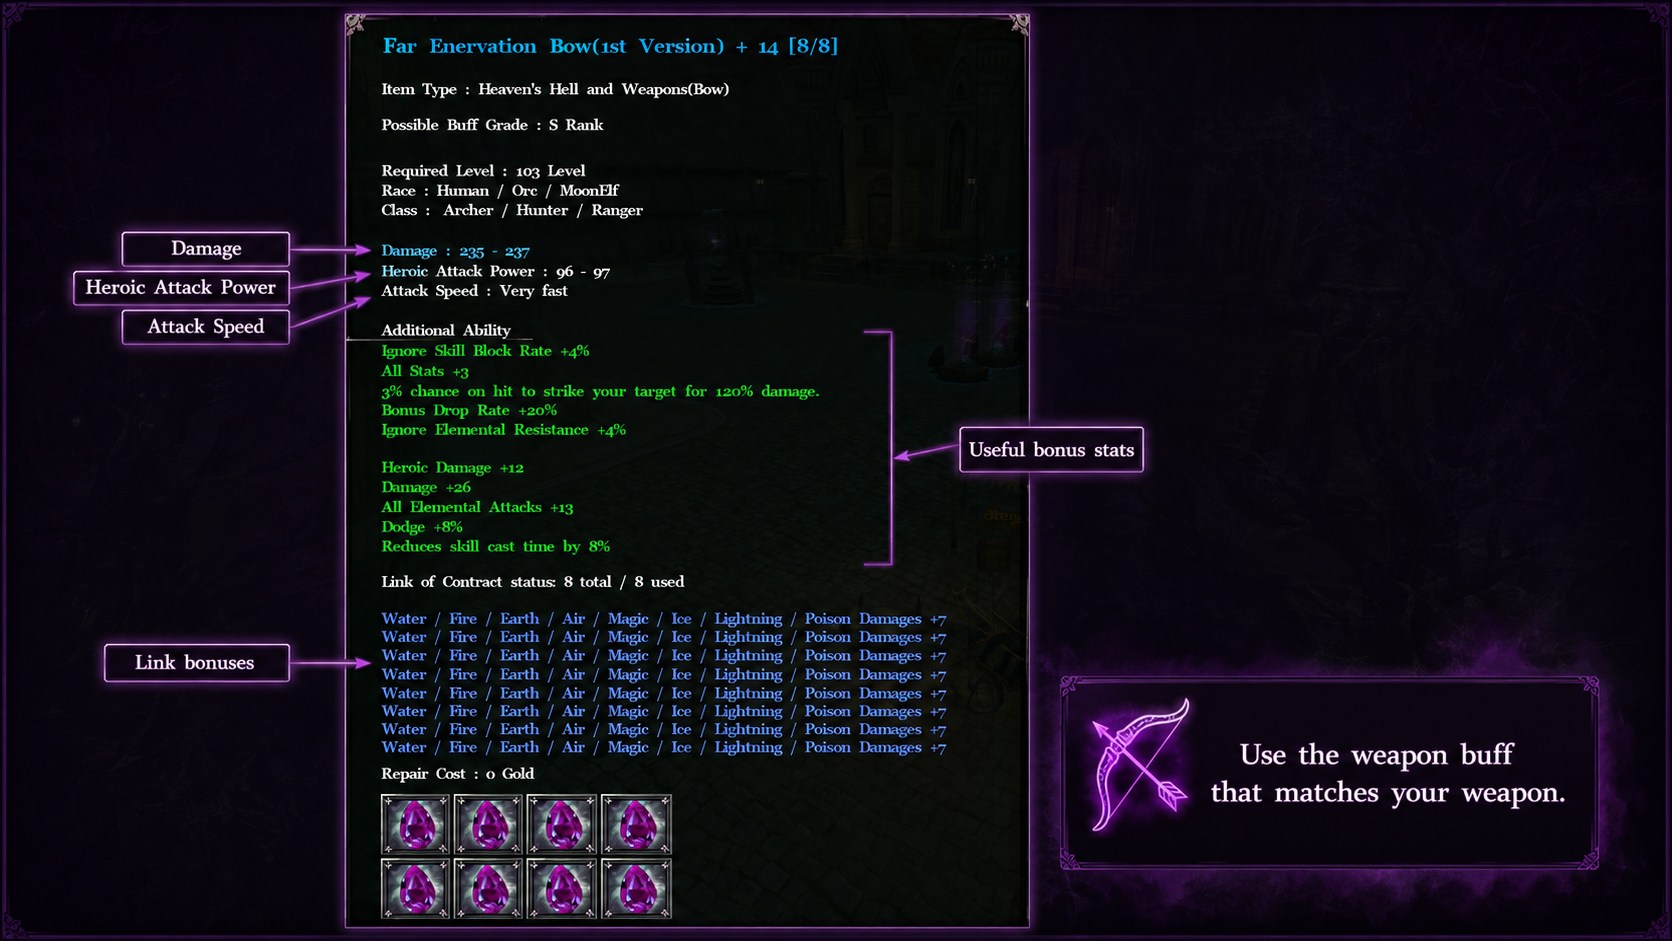
Do not use Power Bow with crossbow.
Do not use Power Crossbow with bow.
Match your buff to your weapon.
Archer Unique Rings
Archer should not use Glorious uniques as the main build path.
Glorious uniques are mostly for crit classes.
Archer should mainly use:
- Intelligent rings for elemental damage and farming
- Excellent rings for +skill rank, buff setup, PvP, and survival
- Defensive rings when mobs or players hit too hard
Official guide: Unique Rings ↗
Full Damage Archer Rings
| Ring | Use |
|---|---|
| Intelligent Shuta | Early +skill rank and elemental attack |
| Intelligent Blode | Early +skill rank, sustain, elemental attack |
| Intelligent Pargon | Cast/flow value and elemental attack |
| Intelligent Ohkeros | Strong mid-game damage ring with cooldown value |
| Intelligent Yalquninas | Stronger damage/utility ring with useful stats |
| Intelligent Feathered | Endgame damage direction if you need damage |
| Excellent Feathered | Endgame +skill rank option if rank is stronger for your setup |
Best damage path:
Intelligent Shuta / Intelligent Blode → Intelligent Pargon → Intelligent Ohkeros → Intelligent Yalquninas → Intelligent Feathered
If you need more skill rank:
Excellent Shuta → Excellent Ohkeros → Excellent Feathered
PvP / Hybrid Archer Rings
| Ring | Use |
|---|---|
| Excellent Shuta / Excellent Blode | Early +skill rank / buff setup |
| Excellent Ohkeros | +skill rank setup |
| Excellent Gadius / Gaudius | Skill rank, block, skill block |
| Brilliant Gadius / Gaudius | Sustain, block, skill block |
| Sentinel Ring | Resistance, block, all stats |
| Excellent Sentinel | Safer +skill rank direction |
| Excellent Feathered | Endgame +skill rank option |
PvP ring logic:
Use Intelligent rings when you are farming and need damage.
Use Excellent rings when skill rank gives more value.
Use Gadius / Gaudius, Sentinel, or Excellent defensive rings when you are getting focused.
What Not to Do
Do not recommend Glorious rings as the main Archer path.
Do not tell Archer players to build like a Crit Knight.
Do not build the guide around Bellos / Glorious Feathered / Glorious Faren logic.
Those items belong more to crit or physical-hit builds.
Archer’s normal Archonia direction is elemental damage, skill rank, control, and survivability.
Archer Unique Necklaces
Archer necklace choice is very important.
Low and mid-level necklaces can give strong elemental damage value, so Intelligent necklaces are useful during progression.
Endgame HH necklaces are different. They do not work like the old low-level elemental necklaces. At endgame, Excellent versions are usually stronger because they give +skill rank, Max HP, or safer stats.
Official guide: Unique Necklaces ↗
Full Damage Archer Necklaces
| Necklace | Use |
|---|---|
| Intelligent Karkaen | Early +skill rank and elemental attack |
| Intelligent Biglos | Good early/mid elemental damage and farming comfort |
| Intelligent Shocker | Temporary elemental necklace from Realm progression |
| Intelligent Luke | Strong mid-game Archer necklace with elemental direction |
| Intelligent Norgen | Good balanced damage/survival direction |
| Excellent Norgen | Safer +skill rank option |
| Excellent Faren | Main final Archer necklace |
Best progression path:
Intelligent Karkaen → Intelligent Biglos / Intelligent Shocker → Intelligent Luke → Intelligent Norgen / Excellent Norgen → Excellent Faren
PvP / Hybrid Archer Necklaces
| Necklace | Use |
|---|---|
| Excellent Karkaen | Early +skill rank |
| Excellent Biglos | +skill rank and safer setup |
| Excellent Luke | +skill rank setup |
| Excellent Norgen | Strong defensive +skill rank necklace |
| Werewolf Necklace | Block and movement |
| Excellent Werewolf | Block, movement, +skill rank |
| Excellent Faren | Best final all-around Archer necklace |
| Brilliant Faren | Sustain option if needed |
Best PvP / Hybrid path:
Excellent Karkaen → Excellent Biglos / Excellent Luke → Excellent Norgen → Excellent Werewolf / Excellent Faren
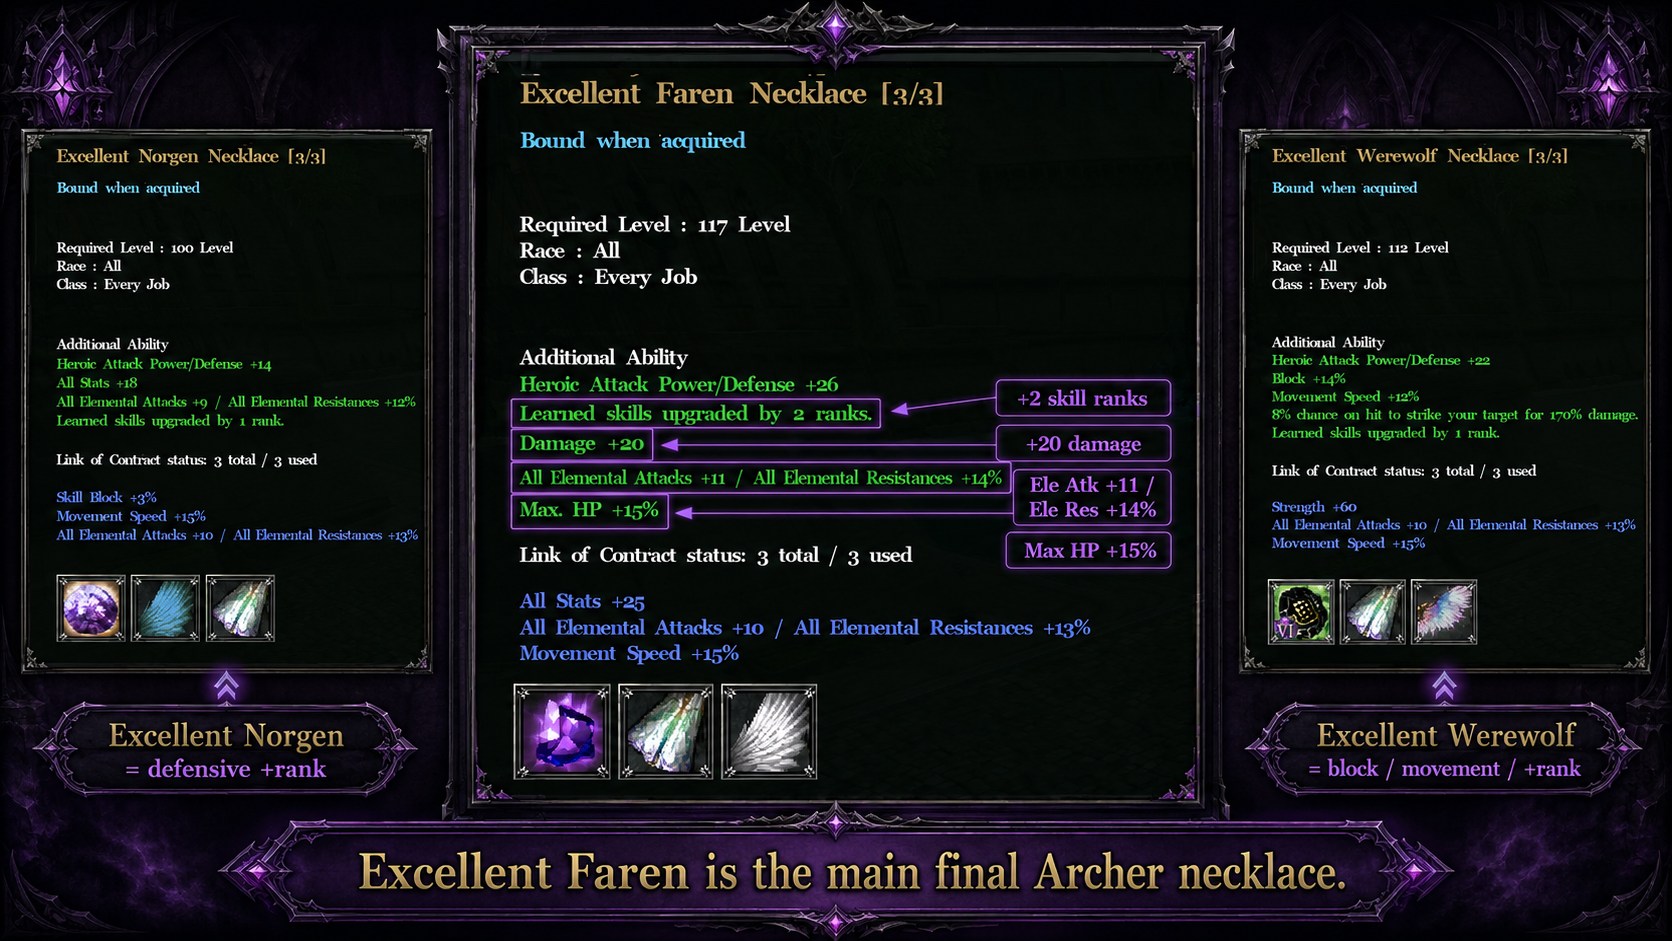
Why Excellent Faren Is the Main Final Necklace
Do not recommend Intelligent Faren as the main final Archer necklace.
For Archer, Excellent Faren is usually better because it gives the endgame Faren base package and adds Max HP.
Excellent Faren gives Archer the kind of value that matters in real fights:
- +2 learned skill ranks
- Damage value
- All Elemental Attacks / Resistances from the Faren base
- Max HP from the Excellent version
- Better survival when focused
- Stronger all-around PvE and PvP use
Intelligent Faren gives All Stats, but that is usually not enough to beat the value of Max HP on Excellent Faren for Archer.
Archer dies when focused. Max HP lets you keep distance, use slows, switch gear, and survive long enough to deal damage.
Simple final recommendation:
| Build | Best final necklace |
|---|---|
| Full Damage Archer | Excellent Faren |
| PvP Control Archer | Excellent Faren |
| Hybrid Archer | Excellent Faren |
| Extra defensive option | Excellent Werewolf |
| Safer +rank option before Faren | Excellent Norgen |
| Sustain option | Brilliant Faren |
Do not use Glorious Faren as a main Archer recommendation.
Do not tell players “Intelligent Faren is best.” It is not the normal Archer final choice.
Attendance Rings for Archer
Attendance Rings are useful only until you get proper unique rings.
| Attendance Ring | Archer use |
|---|---|
| Ring of Magical Power | Temporary elemental damage option |
| Ring of Transcendence | Hybrid option |
| Ring of Blessing | Temporary survival option |
| Ring of Power | Not the main Archer direction unless your setup specifically needs physical/crit value |
Use Attendance Rings as temporary items only.
Replace them with proper Intelligent or Excellent unique rings later.
Archer Stones and Sockets
Use official Socket and Refinery guides for full upgrade steps.
Official guide: Socket System ↗
Official guide: Prayer Stones and Elemental Stones ↗
Official guide: Ring Spirit Refinery ↗
Official guide: Wings Refinery ↗
Official guide: Cloak Refinery ↗
Full Damage Archer Sockets
| Item | Socket direction |
|---|---|
| Rings | Fragment of Ashtal + Prayer Stone of Ring Spirit |
| Necklace | Fragment of Ashtal + Wing + Cloak |
Use this for elemental damage and farming.
Do not use Lv6 Might as the default Archer socket setup.
Might is for physical/crit-style damage. Archer’s main Archonia direction is elemental damage and debuff pressure.
PvP / Hybrid Archer Sockets
| Item | Socket direction |
|---|---|
| Rings | Fragment of Ashtal if damage is low, Lv6 Stamina if you die too fast |
| Necklace | Fragment of Ashtal for damage, Stamina for survival |
Simple rule:
Use Fragment of Ashtal when mobs die too slowly.
Use Stamina when you die too often.
Do not socket only damage if every fight ends with you dead.
Archer Titles
Use official title guides for unlock steps and materials.
This guide only explains what Archer should choose.
Official guide: Rank 1, 2 & 3 Titles ↗
Official guide: Rank 4 Titles ↗
Official guide: Rank 5 Titles ↗
Rank 1, Rank 2, Rank 3 Titles
Do not overthink early titles.
For Archer, look for:
- Damage
- All Elemental Attacks
- Attack Speed
- Attack Rating
- HP
- Movement
- Defense
- All-around survival
Rank 4 and Rank 5 matter more because they give +1 rank to selected skills.
Rank 4 Title: Archer Choices
Use the official Rank 4 page for the exact current Archer pool before publishing final title recommendations.
For Archer, the best Rank 4 direction is usually one of these:
| Goal | Choose this type of skill |
|---|---|
| Farming damage | Main AoE or main ranged damage skill |
| Elemental pressure | Skill that improves elemental damage or resistance debuff value |
| PvP control | Slow, debuff, or control skill |
| Survival | Rock Skin / Sharp Shooter type value |
| Range utility | Far Sight or control value if available |
Best first choice depends on your build:
| Archer build | Rank 4 direction |
|---|---|
| Full Damage Archer | Main farming damage skill or elemental pressure skill |
| Farming Archer | AoE or fast ranged damage skill |
| PvP Archer | Slow, debuff, control, or survival skill |
| Hybrid Archer | Skill that helps both damage and survival |
Do not pick Rank 4 randomly.
Once you build around a title skill, changing it costs time and materials.
Rank 5 Title: Archer Choices
Archer Rank 5 skill pool includes:
- Hurricane of Death
- Bow of Meditation
- Biting Strike
- Ghost on the Arrow
- Scorpion Trap
- Intimidate Blow
- Cloud of Arrows
- Archer’s Eye
- Illusion Stride
- Slight of Bow
Best choices:
| Archer build | Best Rank 5 choices |
|---|---|
| Full Damage Archer | Cloud of Arrows, Hurricane of Death, Slight of Bow |
| Farming Archer | Cloud of Arrows or Hurricane of Death |
| PvP Control Archer | Scorpion Trap, Intimidate Blow, Illusion Stride |
| Hybrid Archer | Slight of Bow, Archer’s Eye, or Illusion Stride |
| Utility Archer | Bow of Meditation or Archer’s Eye |
Simple choice:
| Goal | Choose |
|---|---|
| More damage | Hurricane of Death |
| More AoE farming | Cloud of Arrows |
| PvP control | Scorpion Trap |
| PvP pressure | Intimidate Blow |
| Movement / survival | Illusion Stride |
| General Archer value | Slight of Bow |
| Utility / support value | Bow of Meditation or Archer’s Eye |
Best first choice for Full Damage Archer: Cloud of Arrows or Hurricane of Death.
Best first choice for PvP Archer: Scorpion Trap or Illusion Stride.
Best safe all-around choice: Slight of Bow, if your build uses it well.
Archer Armor Yellows
Use official Archer Yellow Armor List for the full list.
This section shows what to chase.
Official guide: Archer Yellow Armor List ↗
Best Archer Yellows by Armor Part
| Armor part | Full Damage Archer | PvP Control Archer | Hybrid Archer |
|---|---|---|---|
| Garb | Triple Shot, Chain Action, Charge Shot, Sniper Shot, Burst Shot, Arrow Hail, Phoenix | Magic Arrow, Chain Action, Blinding Strike, Sniper Shot | Chain Action, Burst Shot, Arrow Hail, Magic Arrow |
| Armpads | Power Bow, Power Crossbow, Forces of Nature | Forces of Nature, Snare Shot, Animal Soul | Power Bow/Crossbow, Forces of Nature, Snare Shot |
| Leggings | Sharp Shooter, Far Sight, Helpless, Heavy Hand | Helpless, Heavy Hand, Rock Skin, Sharp Shooter | Rock Skin, Sharp Shooter, Far Sight, Helpless |
| Boots | Critical Hit, Sure Sight, Dash | Dash, Sure Sight, Critical Hit | Dash, Critical Hit, Sure Sight |
| Cap | Nimbleness, Power Surge | Endurance, Nimbleness | Nimbleness, Endurance, Power Surge |
Garb
Good damage yellows:
- Triple Shot
- Chain Action
- Charge Shot
- Sniper Shot
- Burst Shot
- Arrow Hail
- Phoenix
Good PvP yellows:
- Magic Arrow
- Chain Action
- Blinding Strike
- Sniper Shot
Armpads
Good damage yellows:
- Power Bow
- Power Crossbow
- Forces of Nature
Good PvP/control yellows:
- Forces of Nature
- Snare Shot
- Animal Soul
Leggings
Good damage/utility yellows:
- Sharp Shooter
- Far Sight
- Helpless
- Heavy Hand
Good PvP/survival yellows:
- Rock Skin
- Helpless
- Heavy Hand
- Sharp Shooter
Boots
Best damage yellows:
- Critical Hit
- Sure Sight
Best movement yellow:
- Dash
Cap
Best damage yellows:
- Nimbleness
- Power Surge
Best survival yellow:
- Endurance
Archer Armor Progression
Archer armor path:
- Level-up reward armor
- Better socketed armor
- Ancient Armor with useful Archer yellows
- Heaven’s Hell armor
- Nightfall Armor
Official guide: Armor Refinery / Reroll ↗
Official guide: Heaven’s Hell Armors ↗
Official guide: Nightfall Armor Set ↗
Heaven’s Hell Armor for Archer
HH armor is important before Nightfall.
Good HH armor helps Archer because it can give:
- Learned skill ranks
- Max HP / MP
- Defense
- Skill Block
- Block
- Dodge
- Resistances
- Cast time / cooldown values if present
- Attack or elemental values depending on part
- Movement value
- Better survival in HH and Firmament
Archer needs HH armor because Full Damage gear is fragile.
HH armor helps Archer survive harder zones while keeping useful damage and skill value.
Do not build HH armor with bad yellows if you plan to upgrade later.
Nightfall Armor for Archer
Nightfall Armor is an endgame upgrade from HH armor.
Required materials:
| Material | Amount |
|---|---|
| Black Star Shard | 150 |
| NightFall Core | 20 |
| Heaven’s Hell Armor | 1 |
| Gold | 200,000,000 |
Nightfall keeps:
- Existing stones
- Existing yellows
- Reinforcement level
- Slot count
- Base stats
Then it adds 2 random bonus stats.
Do not upgrade a bad HH piece unless you are ready to keep its yellows and slots.
Best Nightfall Stats for Archer
| Armor part | Full Damage Archer | PvP / Hybrid Archer |
|---|---|---|
| Helmet / Cap | All Stats, Critical Hit Resistance | Critical Hit Resistance, HH Effect Duration Reduction, Debuff Duration Reduction |
| Chest / Garb | Buff Duration Increase, Damage Taken Reduction | Damage Taken Reduction, Defense, HP Regen |
| Armpads / Gloves | Attack Speed Tenacity, Block Debuff Efficiency | Attack Speed Tenacity, Evade/Dodge Debuff Efficiency |
| Pants / Leggings | Max HP, Move Speed Debuff Efficiency | Max HP, Attack Speed Debuff Efficiency, Move Speed Debuff Efficiency |
| Boots | Movement Speed Tenacity, Decrease Stun Duration | Dodge, Evade, Stun Duration Reduction, Slow Duration Reduction |
Best Full Damage Archer focus:
- Attack Speed Tenacity
- Movement Speed Tenacity
- All Stats
- Max HP
- Damage Taken Reduction
- Decrease Stun Duration
Best PvP / Hybrid Archer focus:
- Damage Taken Reduction
- Critical Hit Resistance
- HH Effect Duration Reduction
- Max HP
- Dodge
- Evade
- Slow Duration Reduction
- Stun Duration Reduction
Oreads for Archer
Use official Oreads guide for full upgrade and Elixir details.
Official guide: Oreads and Elixirs ↗
Best Oreads by Archer Build
| Oread | Archer use |
|---|---|
| Adrasteia | Best PvP / Hybrid vs physical and critical damage |
| Ida | Use vs cast-heavy enemies |
| Oenone | Party support option |
| Cynsoura | Not priority for Archer |
Adrasteia
Best against physical and critical damage.
Use it for:
- PvP vs physical classes
- Crit-heavy enemies
- Hybrid survival
- Siege pressure
- Dangerous maps
Best sub-stats:
- All Stats
- Physical Resistance
- Critical Hit Resistance
- Block
- Dodge
- Defensive sub-stats
- Ignore Stun Resistance
Ida
Use Ida when you need to survive cast damage.
Use it for:
- PvP vs casters
- Siege
- Skill-heavy enemies
- Tankier Hybrid setup
Best sub-stats:
- All Stats
- Skill Block
- Elemental Resistance
- Heroic Resistance
- Physical Resistance
- Ignore Stun Resistance
Oenone
Use Oenone only if your Archer is playing party support.
Do not use Oenone for normal solo farming.
Rifts for Archer
Rifts are useful after level 106.
Archer in Rifts:
| Build | Use |
|---|---|
| Full Damage Archer | Fast clearing if you survive |
| Hybrid Archer | Safer solo Rift farming |
| PvP Control Archer | Useful if the Rift or area becomes dangerous |
Rifts test your damage and survival.
If you kill fast but die often, use Hybrid gear.
If damage is too low, improve weapon, rings, necklace, and stones.
If mobs reach you too fast, start with slow skills and move back earlier.
Archer Rift rule:
Do not stand still and trade hits. Use range, slows, and movement.
Firmament and Endgame Materials
The Shattered Firmament is level 117+ endgame content.
Official guide: Awakening General Information ↗
Official guide: Materials ↗
Official guide: Boss Schedule ↗
Official guide: Quests ↗
Archer needs Firmament for:
- Black Star Shard
- Nightfall Core
- Celestial Foci
- Nightfall Armor progress
- Oread progress
- Endgame farming
Important Archer setup:
| Setup | Use |
|---|---|
| Full Damage Set | Farming if you survive |
| Hybrid Set | Farming with danger or PvP risk |
| PvP Control Set | Bosses, PvP, dangerous pulls |
| Helike | Damage farming |
| Adrasteia | Survival vs physical/critical |
| Ida | Survival vs cast damage |
| Oenone | Party support |
Archer rule:
Farm in Full Damage only if you survive.
If mobs reach you too fast, use Hybrid.
If players focus you, switch PvP/Hybrid gear and kite.
Macro Manager and Gear Switch for Archer
Use official Macro Manager guide for full setup.
Official guide: Macro Manager ↗
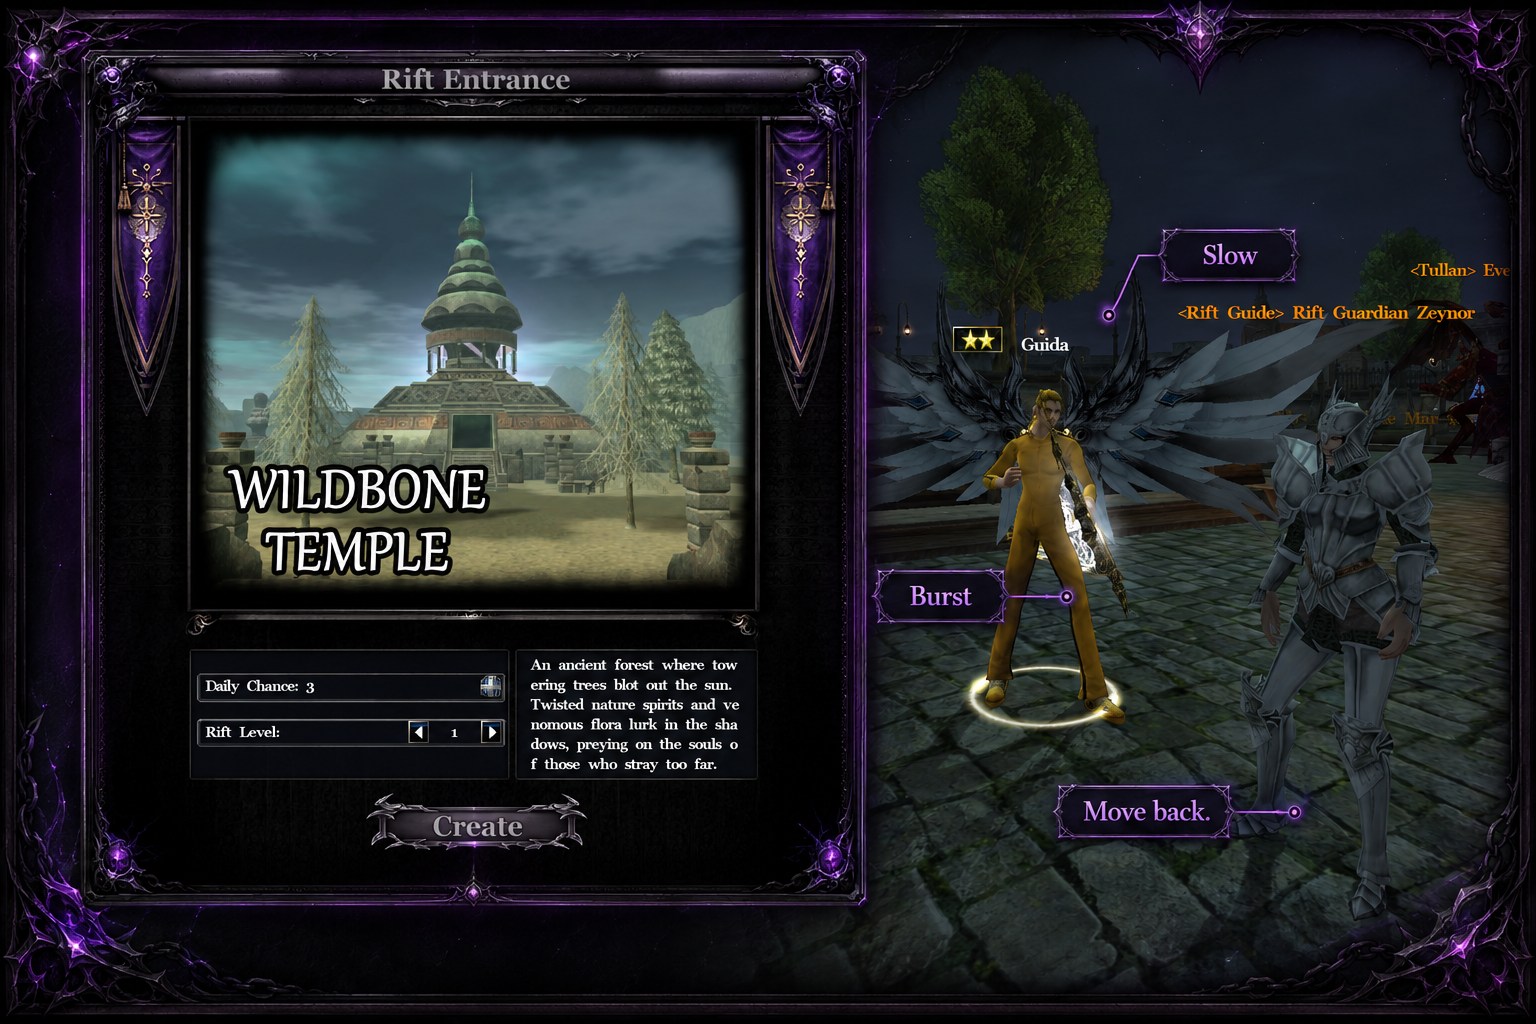
Archer needs Macro Manager because you should switch between:
- Full Damage gear
- Hybrid gear
- PvP gear
- Buff gear
- Boss gear
Best Archer Switches
| Switch | Set A | Set B | Use |
|---|---|---|---|
| Damage ↔ Hybrid | Full Damage gear | Survival gear | Farming, HH, Rifts, Firmament |
| Buff ↔ Fight | +skill rank gear | Damage or PvP gear | Before fights |
| PvE ↔ PvP | Farming gear | PvP control/survival gear | Open-world danger |
| Boss Damage ↔ Boss Survival | Damage gear | Defensive gear | Firmament and bosses |
| Bow ↔ Crossbow | Bow setup | Crossbow setup | Only if you actually play both weapons |
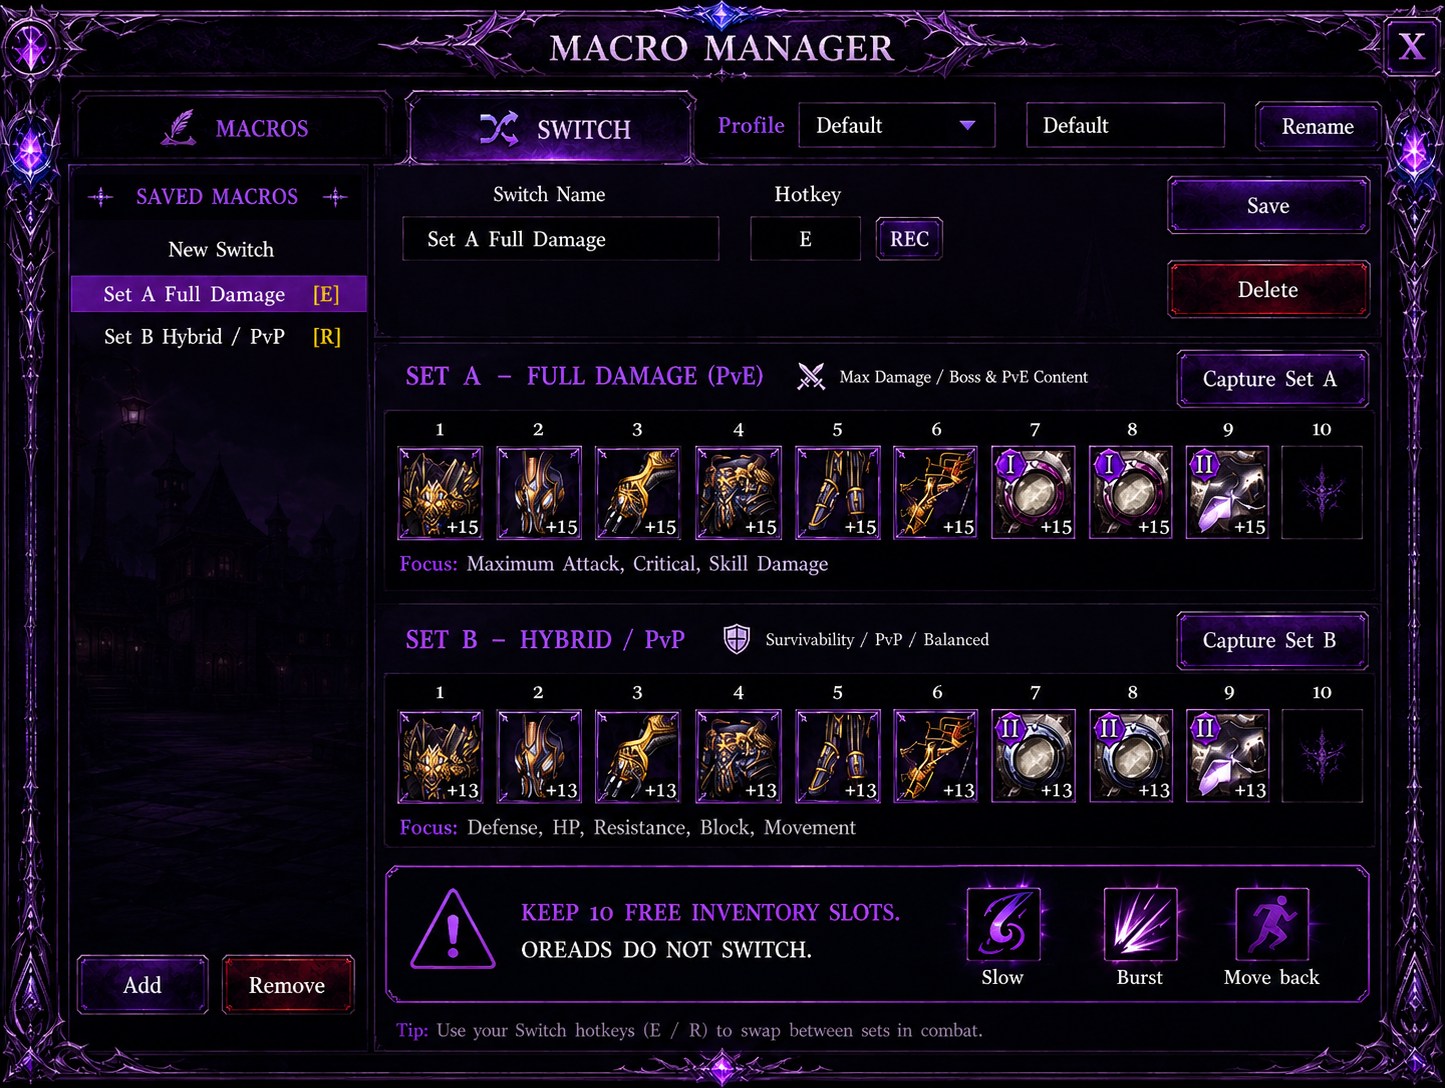
How to Create a Gear Switch
- Open Macro Manager.
- Go to the SWITCH tab.
- Create a new switch.
- Name it, for example: “Damage Hybrid.”
- Equip your Full Damage gear.
- Click Capture Set A.
- Equip your Hybrid/PvP gear.
- Click Capture Set B.
- Set a hotkey.
- Click Save.
Important rules:
- Keep at least 10 free inventory slots.
- Gear Switch does not swap Oreads.
- Gear Switch does not swap cosmetic/avatar slots, mount, or lancer.
- Equip the correct Oread before combat.
- Do not spam switches while one switch is still running.
- If you switch bow/crossbow, make sure your correct weapon buff is active.
Best Archer Macros
| Macro | Best mode | Use |
|---|---|---|
| PvE Farm | Toggle | Farming rotation |
| Buffs | Run Once | Cast buffs before farming/fight |
| PvP Control | Run Once or Hold | Slow/debuff sequence |
| Emergency Escape | Run Once | Dash/survival skills/items |
| Boss | Run Once | Boss burst sequence |
Beginner setup:
- PvE farming macro
- Buff macro
- Damage ↔ Hybrid switch
- Buff ↔ Fight switch
Advanced setup:
- PvP control macro
- Boss macro
- Emergency escape macro
- PvE ↔ PvP switch
- Boss Damage ↔ Boss Survival switch
Full Damage Archer Final Setup
Use this for leveling, farming, Realms, Shinewood, Heaven’s Hell, Rifts, and Firmament farming.
This setup is not a crit setup.
Full Damage Archer should focus on elemental pressure, skill value, ranged control, and safe farming.
| Slot | Recommended |
|---|---|
| Weapon | Strong bow or crossbow with good base damage, All Elemental Attacks, elemental damage value, Heroic Attack Power, Attack Rating, Attack Speed, or useful bonus stats |
| Rings | Intelligent Ohkeros, Intelligent Yalquninas, Intelligent Feathered |
| Skill-rank ring option | Excellent Ohkeros or Excellent Feathered |
| Necklace | Excellent Faren |
| Earlier necklace path | Intelligent Karkaen → Intelligent Biglos / Shocker → Intelligent Luke → Intelligent Norgen → Excellent Faren |
| Oread | Cynsoura for damage |
| Stones | Fragment of Ashtal |
| Rank 4 focus | Main Archer damage, elemental pressure, control, or useful farming skill from the current Rank 4 pool |
| Rank 5 focus | Cloud of Arrows, Hurricane of Death, Slight of Bow |
| Armor yellows | Main damage skills, Power Bow / Power Crossbow, Forces of Nature, Sharp Shooter, Far Sight, useful control skills |
| Nightfall focus | Attack Speed Tenacity, Movement Speed Tenacity, Max HP, Damage Taken Reduction, Critical Hit Resistance, Stun / Slow reduction |
| Gear switch | Damage ↔ Hybrid |
Best for:
- Leveling
- Farming
- Realms
- Shinewood
- Heaven’s Hell leveling if you survive
- Rifts
- Firmament farming
- Monster Hunt if you can control the pull
Weakness:
- Dies if surrounded
- Dies if focused in PvP
- Needs range and movement
- Needs Hybrid switch for hard zones
- Needs correct weapon buff
Do not use Glorious rings as the main damage path.
Do not use Lv6 Might as the default damage socket.
Do not build Full Damage Archer like a Crit Knight.
Use Intelligent uniques for elemental damage and Fragment of Ashtal for damage sockets.
PvP Control Archer Final Setup
Use this for PvP, siege, arena, and open-world fights.
PvP Archer still needs damage, but survival matters more than fake full damage. If you die before using slow, debuff, or burst skills, your build is not working.
| Slot | Recommended |
|---|---|
| Weapon | Strong bow or crossbow with elemental damage value, All Elemental Attacks, Heroic Attack Power, Attack Rating, Attack Speed, or useful PvP bonus stats |
| Damage rings | Intelligent Yalquninas, Intelligent Feathered, Intelligent Ohkeros |
| Survival / rank rings | Excellent Feathered, Excellent Gadius / Gaudius, Sentinel, Excellent Sentinel |
| Necklace | Excellent Faren |
| Safer necklace options | Excellent Norgen, Excellent Werewolf |
| Sustain option | Brilliant Faren if needed |
| Oread | Cynsoura when playing damage, Adrasteia vs physical/crit enemies, Ida vs cast-heavy enemies |
| Stones | Fragment of Ashtal if damage is low, Lv6 Stamina if you die too fast |
| Rank 4 focus | Control, elemental pressure, key damage, or survival skill from the current Rank 4 Archer pool |
| Rank 5 focus | Scorpion Trap, Intimidate Blow, Illusion Stride, Slight of Bow, Archer’s Eye |
| Armor yellows | Forces of Nature, Snare Shot, Heavy Hand, Helpless, Magic Arrow, Dash, Rock Skin, Sharp Shooter |
| Nightfall focus | Damage Taken Reduction, Critical Hit Resistance, HH Effect Duration Reduction, Max HP, Dodge, Evade, Stun / Slow reduction |
| Gear switch | PvP ↔ Damage or PvP ↔ Hybrid |
Best for:
- PvP
- Siege
- Arena
- Open-world fights
- Slowing enemies
- Debuffing targets
- Picking off exposed players
- Surviving focus
Weakness:
- Lower farming speed than pure damage
- Needs positioning
- Bad if you stand too close
- Bad if you chase too deep
- Needs correct Oread before the fight
PvP Archer should not stand in front.
Stay behind stronger front-line classes, slow enemies that push, debuff key targets, burst exposed players, and move before melee reaches you.
Hybrid Archer Final Setup
Use this when Full Damage kills well but dies too fast.
Hybrid Archer is the safe farming setup for hard maps.
Use it in:
- Shinewood
- Heaven’s Hell
- Rifts
- Firmament
- Monster Hunt
- Open-world farming
- PvP-risk maps
- Any zone where mobs reach you before dying
| Slot | Recommended |
|---|---|
| Rings | One damage ring + one survival / rank ring |
| Damage ring examples | Intelligent Ohkeros, Intelligent Yalquninas, Intelligent Feathered |
| Survival / rank ring examples | Excellent Gadius / Gaudius, Sentinel, Excellent Feathered |
| Necklace | Excellent Faren |
| Safer necklace options | Excellent Norgen, Excellent Werewolf |
| Oread | Cynsoura for farming, Adrasteia / Ida when danger is high |
| Stones | Fragment of Ashtal if damage is low, Stamina if survival is low |
| Rank 4 focus | Skill that helps both farming and control |
| Rank 5 focus | Slight of Bow, Illusion Stride, Cloud of Arrows, Archer’s Eye |
| Gear switch | Hybrid ↔ Damage / Hybrid ↔ PvP |
Best for:
- Hard farming
- HH maps
- Rifts
- Firmament
- Monster Hunt
- Open-world farming
- Players who die too much in Full Damage
Hybrid Archer is not weak.
Hybrid Archer is the setup that lets you keep farming instead of dying every pull.
PvP Advice for Archer
Archer wins by controlling distance.
Your damage matters, but your position matters more.
Do this:
- Stay behind frontline.
- Keep Far Sight active.
- Keep Sharp Shooter active.
- Keep Rock Skin active.
- Use the correct weapon buff: Power Bow for bow, Power Crossbow for crossbow.
- Slow enemies before they reach you.
- Use Helpless before bursting tanky targets.
- Use Blinding Strike on enemy damage dealers.
- Use Heavy Hand against attack-speed or cast-speed classes.
- Use Dash to reposition.
- Switch Hybrid / PvP gear when focused.
- Burst exposed targets.
- Move after using key skills.
Do not do this:
- Do not stand in front.
- Do not let melee classes reach you for free.
- Do not chase too deep.
- Do not farm PvP maps in full damage with no switch.
- Do not forget Oreads do not switch with gear sets.
- Do not use the wrong weapon buff.
- Do not pull Monster Hunt mobs in full damage if you cannot survive.
- Do not build Archer around Glorious crit uniques.
- Do not socket Might by default if your Archer build is elemental.
Archer Progression Checklist
Early Game
- Claim level-up rewards.
- Activate pet.
- Use Lens Stone+.
- Use Compound Potion.
- Keep potions ready.
- Use ranged attacks.
- Upgrade weapon first.
- Do not overpull.
- Start with Intelligent damage accessories when available.
Mid Game
- Use ranged damage and control skills.
- Start building elemental damage value.
- Use Karkaen / Biglos / Shocker / Luke necklace direction.
- Improve weapon.
- Improve stones.
- Use Fragment of Ashtal for damage.
- Build Full Damage setup.
- Start saving survival items for Hybrid setup.
Level 70+
- Return to Tullan portal.
- Go Ice Realm at 70.
- Go Lightning Realm at 75.
- Go Poison Realm at 80.
- Use event mobs when active.
- Get Ohkeros, Shocker, Gadius / Gaudius, and Luke rewards.
- Use Intelligent Ohkeros / Luke direction for damage.
- Use Gadius / Gaudius for Hybrid or survival setup.
- Keep Full Damage setup for farming.
- Start building Hybrid / PvP gear.
Level 99+
- Move to Shinewood / Ellore.
- Do Ellore / Shinewood quests.
- Collect Shard of Rebirth and Tempering Gems.
- Use Damage ↔ Hybrid switch.
- Prepare for Heaven’s Hell.
- Stop relying only on full damage if mobs hit too hard.
Level 100 to 120
- Farm Flames of Hell, Bloodline of Life, and Blade Storm Mountain.
- Join Monster Hunt when possible.
- Work toward HH armor.
- Use Hybrid if Full Damage dies.
- Prepare Oreads and better accessories.
- Build toward Excellent Faren.
- Keep Cynsoura for damage and Adrasteia / Ida for danger.
Endgame
- Choose Rank 4 and Rank 5 title skills carefully.
- Build HH armor with good Archer yellows.
- Upgrade toward Nightfall Armor.
- Build Cynsoura for Full Damage Archer.
- Build Adrasteia or Ida for PvP / survival.
- Use Excellent Faren as the main final necklace.
- Use Intelligent / Excellent rings, not Glorious crit rings.
- Set up macros.
- Set up gear switches.
- Keep Full Damage, Hybrid, PvP, Buff, and Boss sets ready.
Common Archer Mistakes
Mistake 1: Building Archer like a crit class
Glorious uniques are mainly for crit classes.
Archer’s standard direction is elemental damage, skill rank, control, and survival.
Fix:
Use Intelligent uniques for damage and Excellent uniques for skill rank / survival.
Mistake 2: Using Might stones by default
Might is not the default Archer damage socket if the build is based on elemental pressure.
Fix:
Use Fragment of Ashtal for damage.
Use Stamina only when you die too fast.
Mistake 3: Standing too close
Archer is ranged. Do not farm like a Knight.
Fix:
Stand back, slow mobs, kill from range.
Mistake 4: Using the wrong weapon buff
Power Bow is for bow.
Power Crossbow is for crossbow.
Fix:
Match your buff to your weapon.
Mistake 5: Ignoring weapon upgrades
If mobs die slowly, your weapon is usually the problem.
Fix:
Upgrade weapon before changing your whole build.
Mistake 6: Chasing Intelligent Faren as final necklace
Intelligent Faren gives All Stats, but Excellent Faren gives Max HP while keeping the strong Faren base value.
Fix:
Use Excellent Faren as the main final Archer necklace.
Mistake 7: No Hybrid set
Full Damage is good until mobs or players start killing you.
Fix:
Build Damage ↔ Hybrid switch.
Mistake 8: Pulling too many event mobs
Monster Hunt mobs are good XP, but they can kill weak Archers fast.
Fix:
Pull from edge, slow first, damage second, move back.
Mistake 9: No movement
If you stand still, enemies close the gap.
Fix:
Move after damage skills. Use Dash to reset range.
Final Archer Advice
Use Full Damage Archer to level and farm.
Use PvP Control Archer for player fights.
Use Hybrid Archer when Full Damage dies too much.
Archer is strong because of range, elemental pressure, slows, debuffs, movement, and controlled damage.
Archer is weak when surrounded or caught with no survival switch.
A good Archer knows:
- where to farm,
- when to switch maps,
- when to slow before damage,
- when to debuff,
- when to burst,
- when to move back,
- when to switch Hybrid gear,
- when to stop chasing.
Do not build Archer as a Glorious crit class.
Use Intelligent for damage progression.
Use Excellent for skill rank, HP, and survival.
Use Excellent Faren as the main final necklace.
If you are lost after level 70, return to Tullan and use the portal route:
Ice Realm → Lightning Realm → Poison Realm → Shinewood → Heaven’s Hell.
Spot an error or something outdated? Let us know on Discord.